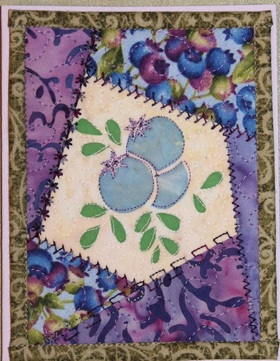
 To make a silk screen print with more than one color, there are just two tricks. One, you have to make a separate screen for each color, and two, they need registration marks so the can be lined up properly. For my blueberry print, I drew my design on paper. Then I drew a line with ends on it above the design, it doesn't matter exactly where. You could put marks in all 4 corners for greater accuracy, but this works on a small print. I then traced just the leaves AND the line onto one piece of iron-on vinyl, then traced just the berries and the line again onto another. (see second photo..the screens look dreadful, but they work:-)) When you go to make your print, you also need to draw the registration marks on your fabric with a removeable pen or chalk. Then line up the registration mark on one screen with the mark on the fabric and make your print. After that is dry, (you can cheat with a hair dryer:-)) repeat with the other screen and the other color of ink. You can do as many colors as you'd like, and they can overlap if you'd like also. They make transparent ink that you can tint with other colors, I'm still waiting for a chance to experiment more with that, too many ideas! I did use it on this card so it wasn't quite so opaque. I added stitching for the berry tops. 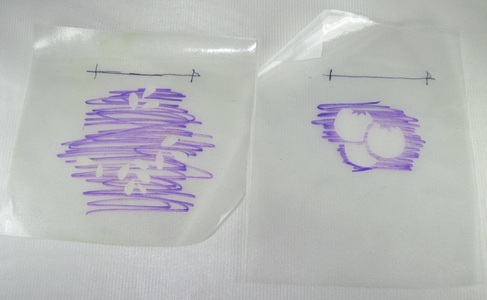
0 Comments
Leave a Reply. |
Beret Nelson's On The Trail Creations Blog Page
Beret NelsonI am a homeschooling mom of three fun kids, who are now old enough that I have a little time to pursue my passion for sewing! After several years of making quilted cards and art quilts, I'm now designing kits and patterns. Some of my designs have been in Keepsake Quilting and Art Quilting Studios magazine! I teach classes online, and am starting to do more traveling and teaching. I also have many tutorials, including some on YouTube. I am blessed to live in Alaska where I am surrounded by the inspiration provided by the beauty of God's creation! Free mini art quilt workshop for new subscribers!
"Like" my facebook page!I am also an independent distributor for Plexus supplements, since I credit them with enabling me to be healthy enough to do all these fun things! They target blood sugar and gut health, which are at the root of so many modern health issues. E-mail me for more info, or check out my website! I am as passionate about getting people healthy as I am about getting people creating :-)
[email protected] or https://plexusworldwide.com/beretnelson  Archives
June 2024
|
 RSS Feed