On The Trail Creations
  • Home
  • Shop Online
    • Art For Sale
    • Collage Art Quilt Kits
    • Store - Wall Hangings/Table Runners Kit & Patterns >
      • Sandhill Sunset Wall Hanging
      • Moonshadows Wall Hanging
      • Moonlight Moose Table Runner
      • Serenity Wall Hanging
      • Summer Dragonfly Wall Hanging
      • Summer Dragonfly Table Runner
      • Moonlight Moose Wall Hanging
      • Autumn Leaves Wall Hanging
      • Autumn Leaves Table Runner
      • Night Owl Wall Hanging Quilt
    • Store - Quilted Greeting Card Kits/Patterns >
      • Acrylic Card Template
      • Trish Stuart Collection
      • Out On a Limb Card Kit
      • Wonder Lake Card Kit
      • Moonshadows Card
      • Raven Moon Card
      • Chickadee With Berries Card
      • Whale Tale Card
      • Moose and Willows Card Kit
      • Raven Card Kit
      • Wild Iris Card
      • Northwoods Nisse Card
      • Boreal Botanicals Card
      • Winter Trees Card
      • For the Birds Card Pattern
      • Wild Flower I Card Pattern
      • Wild Flower II Card Pattern
      • Wild Flower III Card Pattern
      • Wonky Heart Card Pattern
      • Whimsical Heart Card Pattern
      • Black-Capped Chickadee Card
      • Three Leaves Card Pattern
      • Let it Snow Card Pattern
      • Happy Birthday Card Pattern
      • Tundra Swan Card Pattern
      • Milepost Card Pattern
    • Store - Coffee Kuspuks/Quilt Panels >
      • Season of Hope Velvet Panel
      • Screen Prints
      • Coffee Kuspuk
      • Moonlight Moose Potholder Kit
      • Chickadee Menu Planner
      • Spring Flowers Coaster Pattern
      • Teresa Ascone Panels
      • Scrappy Baby Bib
    • Molly Molecule Book
  • Online Classes
    • Simple Secrets for Art Quilting
    • Framed Collage Quilt Class
  • Tutorials
    • Grace quilt tutorial
    • Sewing Machine Needle Organizer Pincushion
    • Organza silk screen tutorial
    • Polymer Clay button tutorial
    • Birch Tree card tutorial
    • Coffee Shop greeting card
    • Free Motion Stitching Tutorials >
      • Free Motion Tutorial
      • 10 minute project tutorial
      • Valentine Coasters
      • Grape hyacinth postcard
      • Advanced free motion projects >
        • Sparkly 3D dragonfly wings
        • Inktense Frog quilt
        • Dream Big flower panel
    • Journal Cover - Book Tutorials >
      • Quilted Book Cover Tutorial
      • 1000 Gifts Journal Cover Tutorial
      • Quiet Book Tutorial
    • Tutorials for Our Kits >
      • Moonshadows Video Tutorials
      • Summer Dragonfly Video Tutorials
      • Serenity Video Tutorials
    • Video Tutorials - Screenprinting, Inktense, Quilted Card Binding
    • Pocket Prayer Quilt
  • Beret's Blog
  • Art Quilt Gallery
  • Quilted Cards Gallery
  • Our Story
  • Our Mission
  • Quilt Shops
  • Contact Us
  • Sked Verks
    • Sked Verks Gallery
    • Sked Verks Online Store
  • Return Policy - FAQs

Grace Quilt Tutorial (Confetti Quilting)

Picture
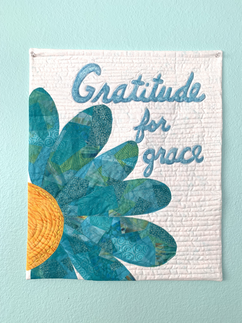
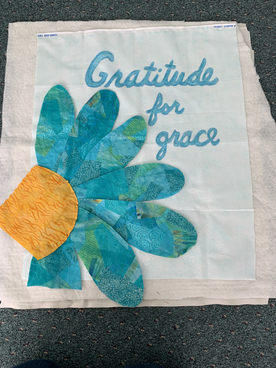
This was a fun, quick project that uses kind of a confetti quilt technique for the petals. I also used Inktense for the words. I like that because I could stitch just outside the letters instead of on them, so they pop up more! Here are some process photos:
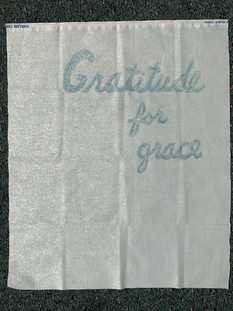
First, I drew the letters on paper,traced them on the fabric, and colored them with dry Inktense pencils
Picture
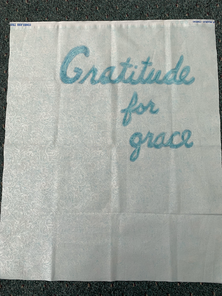
​Then activated the ink. Aloe vera gel or fabric medium work best on fabric, water tends to ‘bleed’. The letters are much brighter! Also, you can see my fairy frost background fabric better in this photo.
Picture
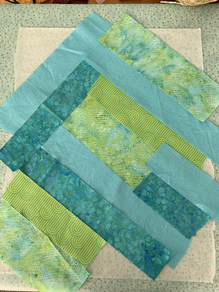
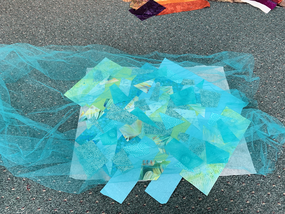
​Now for the fun part! To make the fabric the petals are cut from, I started with a piece of lightweight fusible interfacing. I knew my petals would go into the seam on the edges, so I didn’t want it too stiff. With the glue side up, I covered it with some strips of fabric. You can go straight to the confetti pieces, but I think this saves time and thickness. Fuse them to the interfacing.
Picture
​Then I added some random pieces, placing them mostly over the edges of the first fabrics to break up those long lines.
Picture
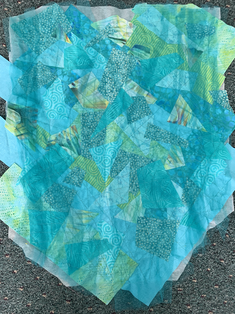
​Ooooops! It looks like I forgot a photo... The next step is to add tulle, but you can see the fabric pieces under it. I didn’t use fusible web on the small pieces. You could, or just dab them with a glue stick. As for the tulle, you can do one layer, more than one, or wrinkle it up, which is what I did. I zapped it with a bit of 505 spray, but mostly used lots of pins!
Picture
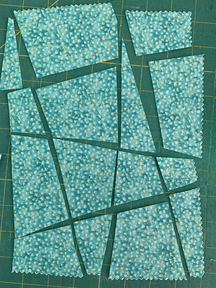
​Then, using a walking foot, I stitched some lines in random directions to hold everything together. You can also use free motion. I recommend a closed hole foot so the toes don’t catch in the tulle. After it was nailed down a bit, I added lots more lines, until I felt like it could be cut up without falling apart.
Picture
Picture
Picture
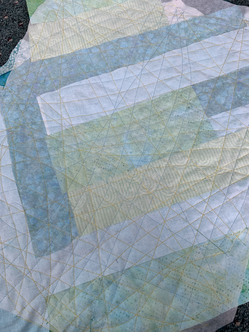
The back looks cool too! The thread color only changed because my bobbin ran out 😁
Picture
​Next, I cut out petal shapes and a center and started arranging them. It was hard to picture what it would look like trimmed, so I took a photo and cropped it on my phone. Really helpful for placement!
Picture
​The cropped photo made it more obvious that my top petal was too short, so I adjusted that by pulling it up a bit. I took a couple more photos and cropped them until I liked it.
Picture
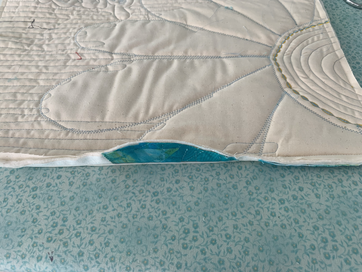
​Hmm, I see I missed a couple more photos... I stacked my top with batting and muslin (pre-backing), zig zag stitched around the petals, quilted the background and around the letters, and did some decorative stitching on the center. I then trimmed it square, but left a ‘bump’ where I planned to leave the hole for turning. This makes it much easier to fold those edges under! I placed the final backing on, right sides together, stitched all the way around except for the hole for turning, and clipped the corners. Two more tips! One, the backing does not have to be cut precisely, just use the edges of the quilt top as your guide for stitching, then trim the excess. Leave a ‘bump’ by the hole on that too! Two, it helps a lot to press the seam allowances by the hole before turning. (Photo below) A great trick I recently discovered!
After it’s turned and pressed, I usually cheat and close the hole with fusible web.
​Let me know if you try it!
Picture
Picture
Picture
  • Home
  • Shop Online
    • Art For Sale
    • Collage Art Quilt Kits
    • Store - Wall Hangings/Table Runners Kit & Patterns >
      • Sandhill Sunset Wall Hanging
      • Moonshadows Wall Hanging
      • Moonlight Moose Table Runner
      • Serenity Wall Hanging
      • Summer Dragonfly Wall Hanging
      • Summer Dragonfly Table Runner
      • Moonlight Moose Wall Hanging
      • Autumn Leaves Wall Hanging
      • Autumn Leaves Table Runner
      • Night Owl Wall Hanging Quilt
    • Store - Quilted Greeting Card Kits/Patterns >
      • Acrylic Card Template
      • Trish Stuart Collection
      • Out On a Limb Card Kit
      • Wonder Lake Card Kit
      • Moonshadows Card
      • Raven Moon Card
      • Chickadee With Berries Card
      • Whale Tale Card
      • Moose and Willows Card Kit
      • Raven Card Kit
      • Wild Iris Card
      • Northwoods Nisse Card
      • Boreal Botanicals Card
      • Winter Trees Card
      • For the Birds Card Pattern
      • Wild Flower I Card Pattern
      • Wild Flower II Card Pattern
      • Wild Flower III Card Pattern
      • Wonky Heart Card Pattern
      • Whimsical Heart Card Pattern
      • Black-Capped Chickadee Card
      • Three Leaves Card Pattern
      • Let it Snow Card Pattern
      • Happy Birthday Card Pattern
      • Tundra Swan Card Pattern
      • Milepost Card Pattern
    • Store - Coffee Kuspuks/Quilt Panels >
      • Season of Hope Velvet Panel
      • Screen Prints
      • Coffee Kuspuk
      • Moonlight Moose Potholder Kit
      • Chickadee Menu Planner
      • Spring Flowers Coaster Pattern
      • Teresa Ascone Panels
      • Scrappy Baby Bib
    • Molly Molecule Book
  • Online Classes
    • Simple Secrets for Art Quilting
    • Framed Collage Quilt Class
  • Tutorials
    • Grace quilt tutorial
    • Sewing Machine Needle Organizer Pincushion
    • Organza silk screen tutorial
    • Polymer Clay button tutorial
    • Birch Tree card tutorial
    • Coffee Shop greeting card
    • Free Motion Stitching Tutorials >
      • Free Motion Tutorial
      • 10 minute project tutorial
      • Valentine Coasters
      • Grape hyacinth postcard
      • Advanced free motion projects >
        • Sparkly 3D dragonfly wings
        • Inktense Frog quilt
        • Dream Big flower panel
    • Journal Cover - Book Tutorials >
      • Quilted Book Cover Tutorial
      • 1000 Gifts Journal Cover Tutorial
      • Quiet Book Tutorial
    • Tutorials for Our Kits >
      • Moonshadows Video Tutorials
      • Summer Dragonfly Video Tutorials
      • Serenity Video Tutorials
    • Video Tutorials - Screenprinting, Inktense, Quilted Card Binding
    • Pocket Prayer Quilt
  • Beret's Blog
  • Art Quilt Gallery
  • Quilted Cards Gallery
  • Our Story
  • Our Mission
  • Quilt Shops
  • Contact Us
  • Sked Verks
    • Sked Verks Gallery
    • Sked Verks Online Store
  • Return Policy - FAQs