Organza Silk Screen Tutorial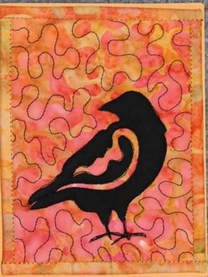
|
New! You can read all of the stuff below, or just watch the video :-) Or both!
|
Making a silk screen out of organza is really quite simple. (I got this idea from Quilting Arts magazine, issue 53, Oct/Nov 2011...that's where I get many of my best ideas, check out the magazine!) Explaining it, however, is a bit difficult, as the parts involved are transparent, and therefore hard to photograph...The first time I saw it, it took me a minute to get my head around it, but then it was so simple. It works best for small projects, as it doesn't involve adding a frame. All you need to make the screen is iron-on vinyl (I use Heat-n-Bond) and organza, it doesn't have to be silk organza.
First, cut out a square of the vinyl a couple of inches bigger than your design on all sides. The iron-on vinyl comes with a paper backing. Trace your design (more on choosing a design at the end) onto this paper, in the center of your square. It does not have to be in reverse. Next, and this is REALLY important, as I found out when I skipped it the first time:-), take a Sharpie marker and scribble all over the VINYL side of your design, making sure you go beyond all edges. (see picture below) If you don't do this, your design will be unbelieveably invisible when you are done:-)
Next, use a utility knife or small scissors or razor blade to cut your design out of the vinyl. Unlike a regular stencil, it can have some unconnected parts, more on that later. When it is all cut out, peel the paper backing off, and lay it carefully (so it stays flat) onto a piece of organza, tacky side down. I start with a piece of organza a bit bigger than my vinyl. Cover with a press cloth and fuse the two layers together, according to the directions on the vinyl. Trim the edges a bit so they are flush, and you are done! You could stabilize it with duct tape around the edges, but I don't find this necessary on small screens.
To use the screen:
I use silk screen ink made for fabric, by Speedball, I get it at Michael's or order online. All you do is take the fabric you want to print on and lay it on a slightly padded surface. I use a cheap vinyl tablecloth folded a time or two, which also protects my work surface. Lay your screen vinyl side down on the fabric, and put a small bead of ink across the top, above your design. (I use a plastic spoon for this) Holding the screen firmly with one hand, use a credit card to drag the ink across your design. Carefully lift the screen off the fabric. Usually you can get several prints before you have to wash the screen. Check after each one to make sure no ink crept under an edge somewhere. If it did, you need to wash the screen before doing another print. To wash, just gently rub it under warm water. If any edges of vinyl peel up, let it dry completely and iron again. I have used mine lots of times without having to do this.
Choosing a design: When I first made the raven screen, it was a solid shape without the wing in the center. The larger expanse was giving me trouble with ink leaking under the edges, so I added the wing to try to fix that. It not only fixed it, but it is much nicer besides:-) If you have a separate shape like that, you can just iron it on separately after the main part is done. My raven feet are small, so I do those with stitching, but I probably could have put them on the screen too. When you design your screen, you just have to remember that whatever parts you remove from the vinyl, that is where the ink will go. You can make either positive or negative prints, depending on what you cut out and what you leave. You can do a couple of samples with simple shapes to experiment.

Screen printing with more than one color:
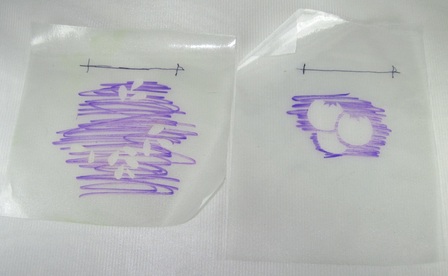
To make a silk screen print with more than one color, there are just two tricks. One, you have to make a separate screen for each color, and two, they need registration marks so they can be lined up properly. For my blueberry print, I drew my design on paper. Then I drew a line with ends on it above the design, it doesn't matter exactly where. You could put marks in all 4 corners for greater accuracy, but this works on a small print. I then traced just the leaves AND the
line onto one piece of iron-on vinyl, then traced just the berries and the line again onto another. (see second photo..the screens look dreadful, but they work:-))
When you go to make your print, you also need to draw the registration marks on your fabric with a removeable pen or chalk. Then line up the registration mark on one screen with the mark on the fabric and make your print. After that is dry, (you can cheat with a hair dryer:-)) repeat with the other screen and the other color of ink.
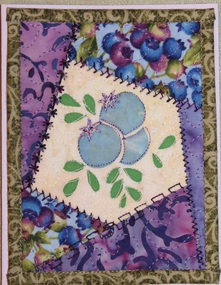
You can do as many colors as you'd like, and they can overlap if you'd like also. They make transparent ink that you can tint with other colors, I'm still waiting for a chance to experiment more with that, too many ideas! I did use it on this card so it wasn't quite so opaque. I added stitching for the berry tops.
line onto one piece of iron-on vinyl, then traced just the berries and the line again onto another. (see second photo..the screens look dreadful, but they work:-))
When you go to make your print, you also need to draw the registration marks on your fabric with a removeable pen or chalk. Then line up the registration mark on one screen with the mark on the fabric and make your print. After that is dry, (you can cheat with a hair dryer:-)) repeat with the other screen and the other color of ink.
You can do as many colors as you'd like, and they can overlap if you'd like also. They make transparent ink that you can tint with other colors, I'm still waiting for a chance to experiment more with that, too many ideas! I did use it on this card so it wasn't quite so opaque. I added stitching for the berry tops.
|
|
Thanks for joining us! Click the photo below to see our kits and patterns, and check out our other tutorials!
|