ON THE TRAIL CREATIONS
  • Home
  • Shop Online
    • Collage Art Quilt Kits
    • Store - Wall Hangings/Table Runners Kit & Patterns >
      • Winterberry Wall Hanging
      • Up to Gnome Good Wall Hanging
      • Sandhill Sunset Wall Hanging
      • Moonshadows Wall Hanging
      • Moonlight Moose Table Runner
      • Serenity Wall Hanging
      • Autumn Leaves Table Runner
      • Summer Dragonfly Wall Hanging
      • Summer Dragonfly Table Runner
      • Autumn Leaves Wall Hanging
      • Moonlight Moose Wall Hanging
      • Night Owl Wall Hanging Quilt
    • Store - Quilted Greeting Card Kits/Patterns >
      • Greeting Card Panels
      • Acrylic Card Template
      • Trish Stuart Collection
      • Out On a Limb Card Kit
      • Wonder Lake Card Kit
      • Moonshadows Card
      • Raven Moon Card
      • Chickadee With Berries Card
      • Whale Tale Card
      • Moose and Willows Card Kit
      • Raven Card Kit
      • Wild Iris Card
      • Northwoods Nisse Card
      • Boreal Botanicals Card
      • Winter Trees Card
      • For the Birds Card Pattern
      • Wild Flower I Card Pattern
      • Wild Flower II Card Pattern
      • Wild Flower III Card Pattern
      • Wonky Heart Card Pattern
      • Whimsical Heart Card Pattern
      • Black-Capped Chickadee Card
      • Three Leaves Card Pattern
      • Let it Snow Card Pattern
      • Happy Birthday Card Pattern
      • Tundra Swan Card Pattern
      • Milepost Card Pattern
    • Store - Coffee Kuspuks/Quilt Panels >
      • Season of Hope Velvet Panel
      • Screen Prints
      • Coffee Kuspuk
      • Moonlight Moose Potholder Kit
      • Chickadee Menu Planner
      • Spring Flowers Coaster Pattern
      • Teresa Ascone Panels
      • Scrappy Baby Bib
    • Art For Sale
    • Molly Molecule Book
  • Online Classes
    • Simple Secrets for Art Quilting
    • Framed Collage Quilt Class
    • Crazy Quilt Greeting Card Class
  • Beret's Blog
  • 40 Ways
    • Videos 40 ways
  • About Us
    • Quilted Card Story
  • Favorite Resources
  • Tutorials
    • Grace quilt tutorial
    • Sewing Machine Needle Organizer Pincushion
    • Organza silk screen tutorial
    • Polymer Clay button tutorial
    • Birch Tree card tutorial
    • Coffee Shop greeting card
    • Free Motion Stitching Tutorials >
      • Free Motion Tutorial
      • 10 minute project tutorial
      • Valentine Coasters
      • Grape hyacinth postcard
      • Advanced free motion projects >
        • Sparkly 3D dragonfly wings
        • Inktense Frog quilt
        • Dream Big flower panel
    • Journal Cover - Book Tutorials >
      • Quilted Book Cover Tutorial
      • 1000 Gifts Journal Cover Tutorial
      • Quiet Book Tutorial
    • Tutorials for Our Kits >
      • Moonshadows Video Tutorials
      • Summer Dragonfly Video Tutorials
      • Serenity Video Tutorials
    • Video Tutorials - Screenprinting, Inktense, Quilted Card Binding
    • Pocket Prayer Quilt
  • Art Quilt Gallery
  • Quilted Cards Gallery
  • Fun Story
  • Contact Us
  • Sked Verks
    • Sked Verks Gallery
    • Sked Verks Online Store
  • Return Policy - FAQs

Borders

10/27/2023

0 Comments

 
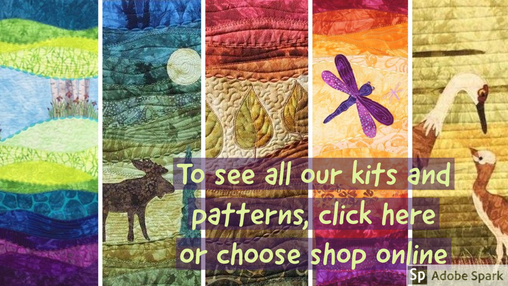
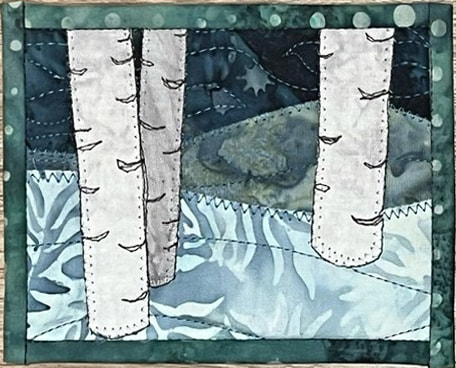
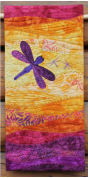
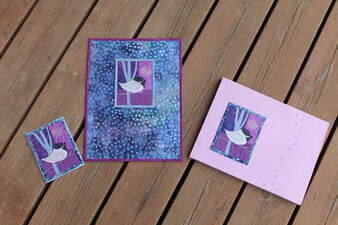
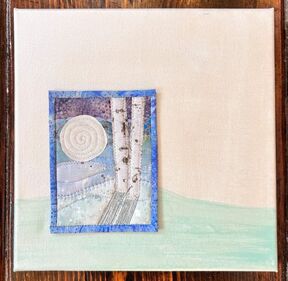
   In class this week we are talking about borders. They are something that is familiar to traditional quilters, although not necessarily the way I do them 😂 I use borders as a way to add interest and also make a small quilt larger. They can be a really fun and easy way to add to your art quilt. I had a few examples in my mini series last summer, and here is another unconventional way to add borders. I started with greeting cards, and either placed them on a painted canvas, or made a new quilted piece to go behind the card. On one canvas I added chickadee tracks with a pen, and on the other I painted a simple hill to match the one on the card. It’s a very quick way to turn a quilted card into a little art piece!
If you want to give it a try, we’re doing a ‘buy two, get one free’ sale on card kits this week! Just purchase two card kits, then write in the notes section which one you would like for your free one. Then of course I'd love to see what you do if you do add background/border with one of these methods 😃 Happy Sewing! Beret 
Quilted Greeting Card Kits
Picture
Picture
0 Comments

Cool bargello technique

10/13/2023

15 Comments

 
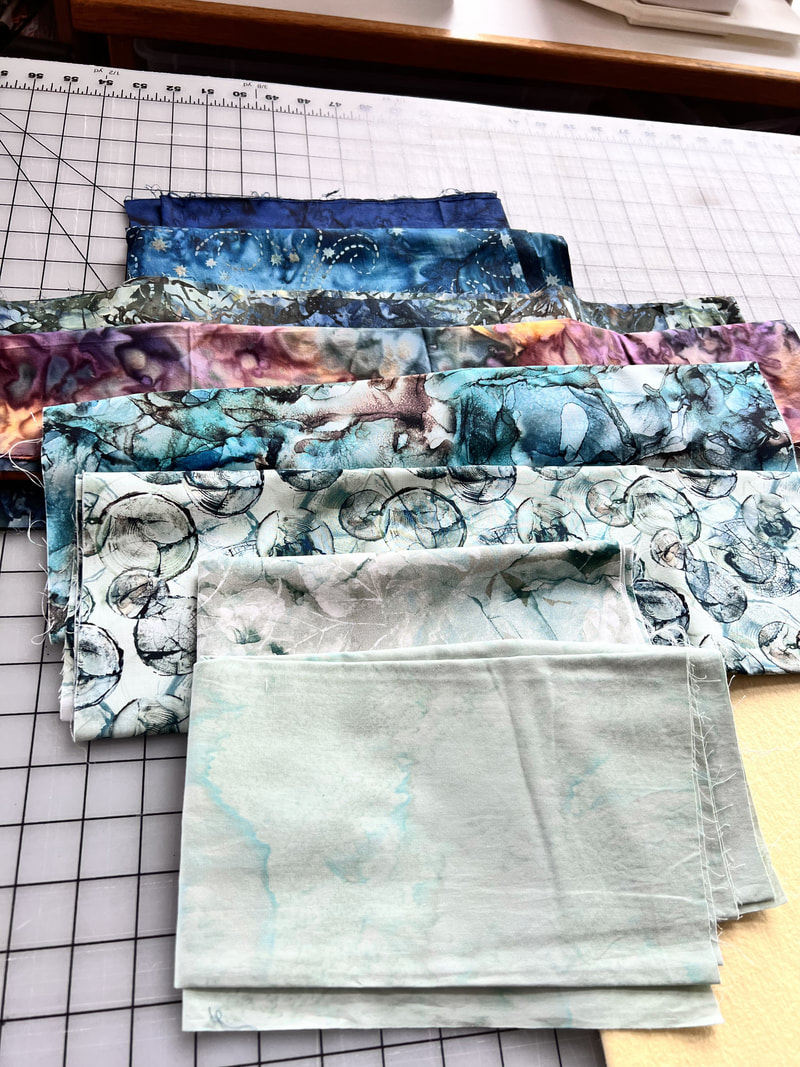
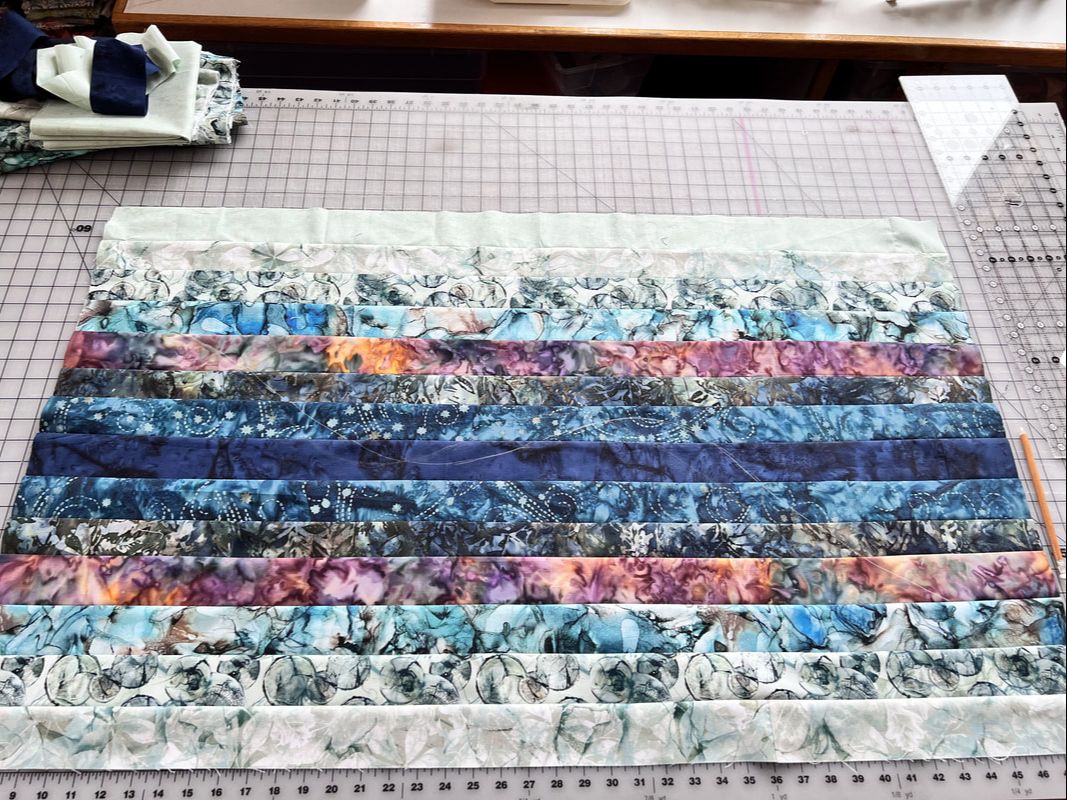
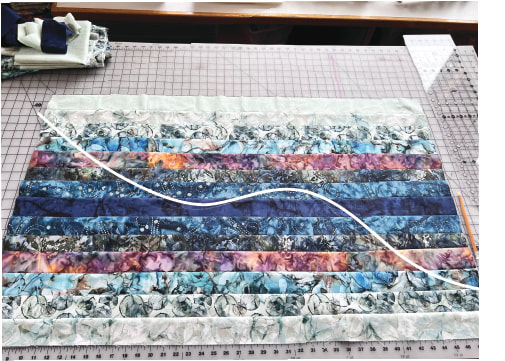
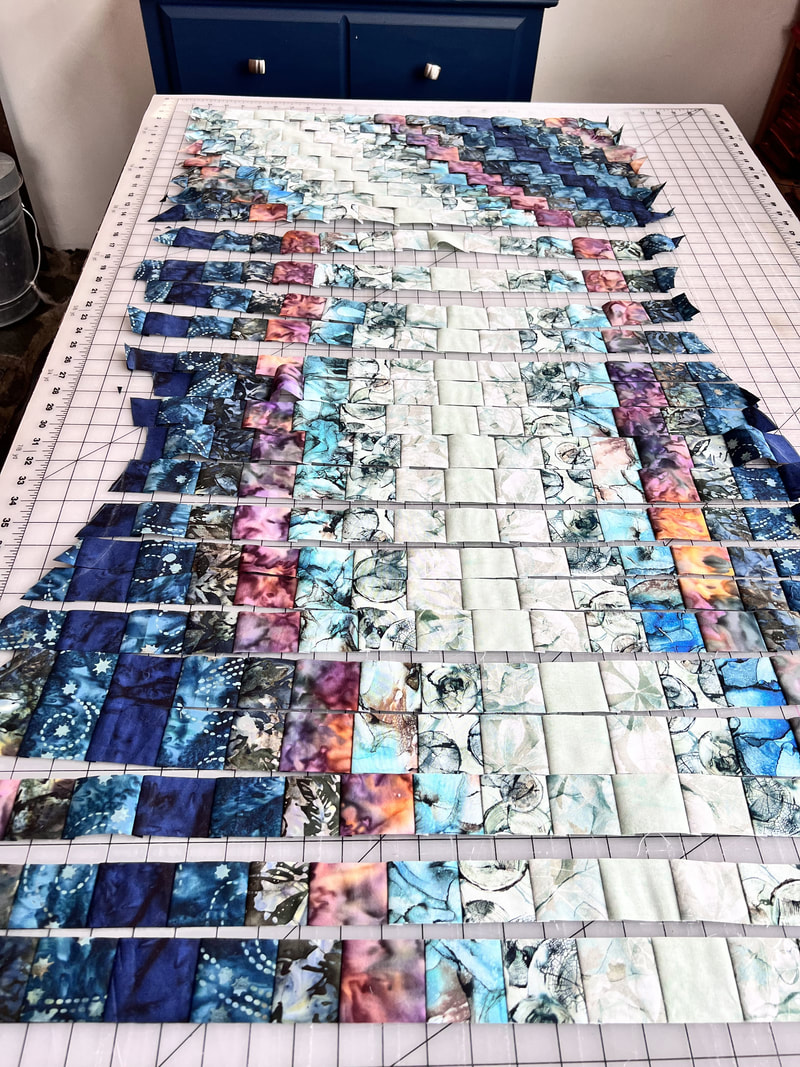
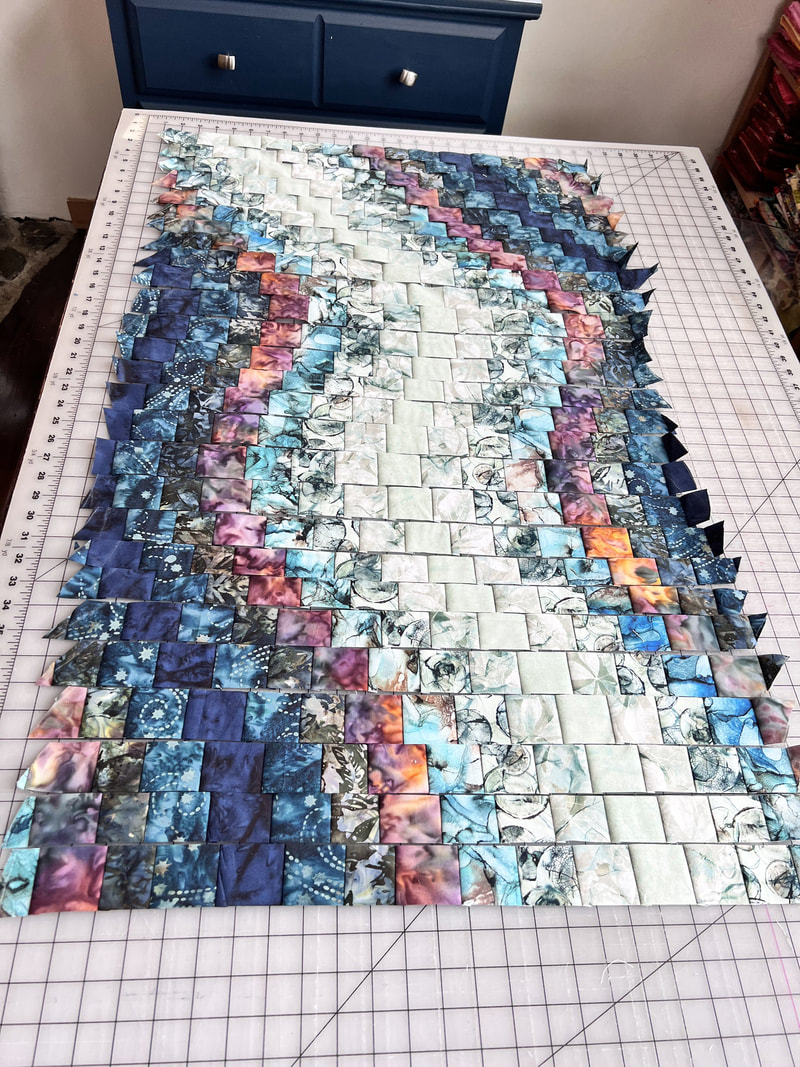
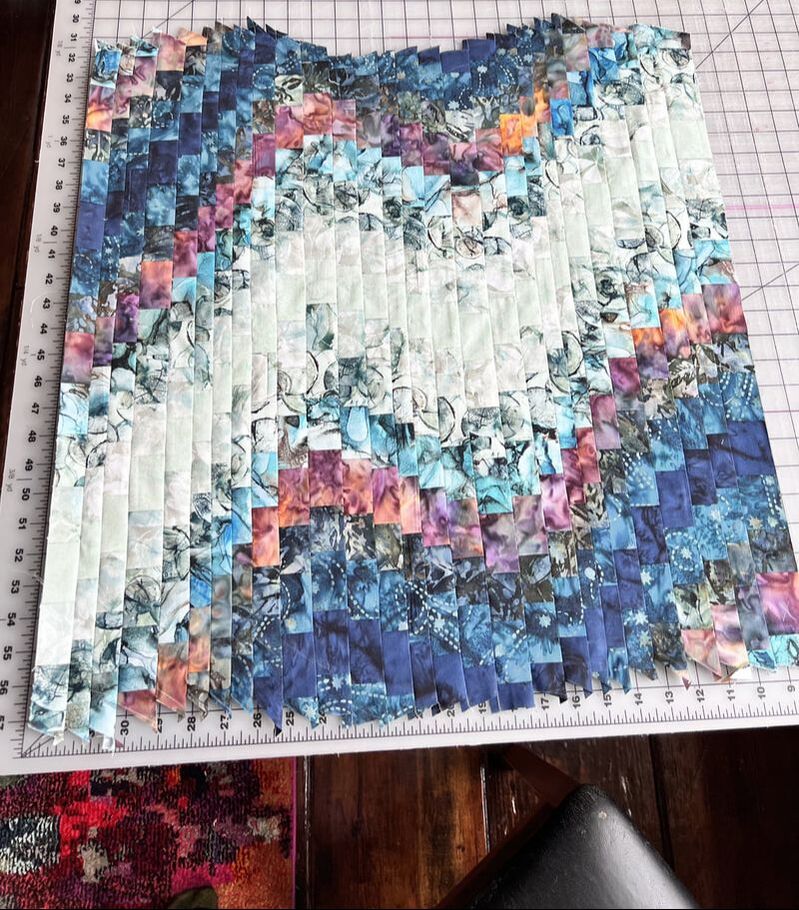
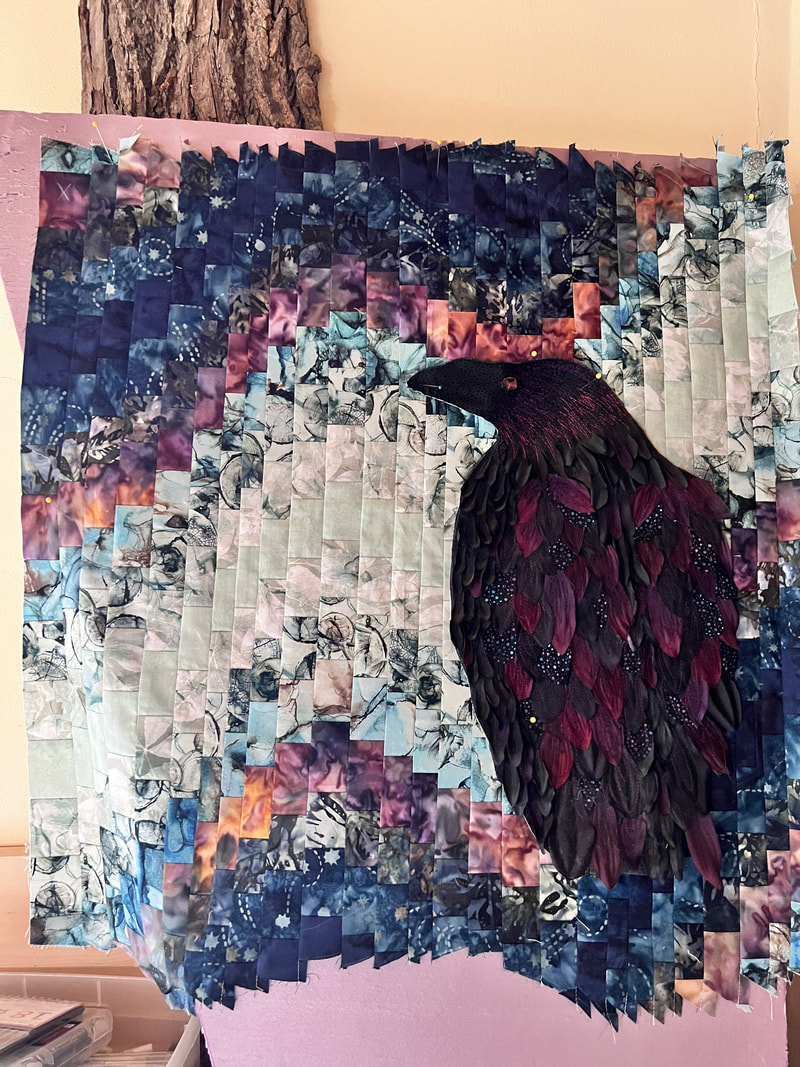
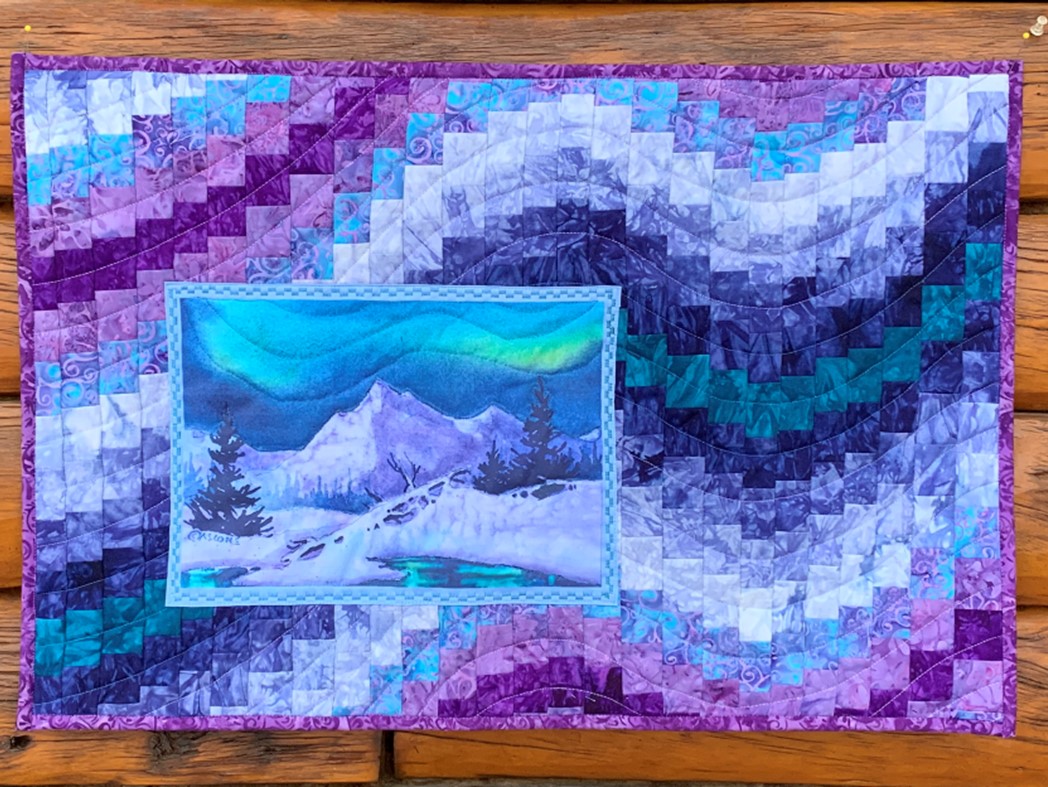
    I don't do a lot of traditional type quilting/piecing, but when I see a technique like this I have to try it! I actually saw it (and tried it) more than 20 years ago first, no idea where... that was before too much internet was happening! Then a few years ago I set out to make a tutorial, and forgot a couple of the most important photos, and it took until now to make another one. There are lots of other bargello techniques out there too! I like how they can look like northern lights. 
    It's another 'very little math' way to make a quilt top/background. It always makes me laugh that I have so many of these when I don't mind the math at all 😂 I am pretty impatient though, so that must be why....
    Anyway, this is so cool! I learned a few things, which I do every time. So now you have the benefit of me trying this three times, and hopefully working out a few of the bugs! 
Picture
Picture
First, I chose 8 fabrics ranging from light to dark. You can use as many as you want! I also added a purplish one that fits into the value gradation, but not the color. I cut mine into 2 1/2" x wof (width of fabric) strips, and there are two of each except the darkest and the lightest. (They can also be any width, but too skinny will cause trouble...more later) Due to the seams and the process, you lose a lot in both directions, but especially left to right, more about that in a bit. Then I stitched them together as shown. Light to dark, then back to light. Only one side gets the lightest strip, doesn't matter which. 
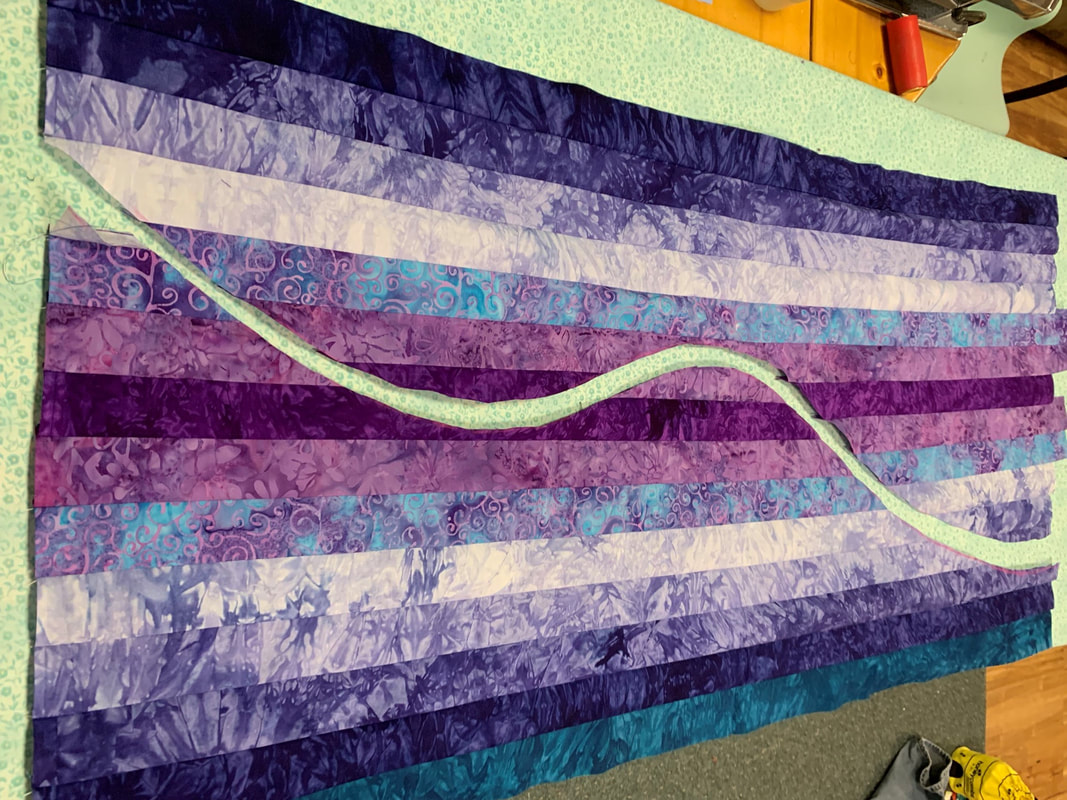
    Super important thing #1: I wanted the light to end up in the middle, so I put the DARK in the middle for this step, it gets reversed! (If you were making a larger quilt, you could do more repetitions of the dark and light, hopefully that will make sense soon. 
    Now for the scary part! You can lay this out with a string to get your line, but you are going to cut through this whole piece something like this. Super important thing #2: This need to be done upside down from how you want it to end up. So, if you care (it might not matter to you) that's something to keep in mind. I wanted my curve to start at the bottom left and end at the top right, so I had to flip that upside down in my mind. Or you can sketch it digitally or on paper also. You want a very gentle curve, nothing too dramatic. (mine might be a bit dramatic still...) It's going to get very squished from left to right. 
Picture
Now you are going to take the bottom chunk and stitch it to the top chunk. This is why you only needed one light strip, now it's in the center. I had to photograph this one sideways 😅
Picture
The next step is to cut this into strips, parallel to the straight edges, perpendicular to the seams. You can do them all the same width if you want, or you can vary them. I went back and forth between 1 1/4" and 1 3/4" in 1/8" increments, or at least mostly.... Do this all the way across. 
Picture
Here's where the magic happens! Now you are going to slide each strip down to the same line. A giant cutting mat helps for this step, but it's not necessary. Keep going until all of the strips are pushed down to that line. The strips are pointy at the end, so for now just line up the tips!
Picture
Cool right? Now 'all' you have to do is stitch them back together. I found a few things that helped this step. One, look for spots that are either not enough change from one to the next, or too much, so that a fabric isn't even touching its matching one on the next strip. Keeping your curve gentle will minimize this issue, as well as not cutting your original strips too skinny. You can scooch the strips around however you want at this point. But if you do anything too dramatic, you will lose more off the top and the bottom when you straighten the edges. 
Picture
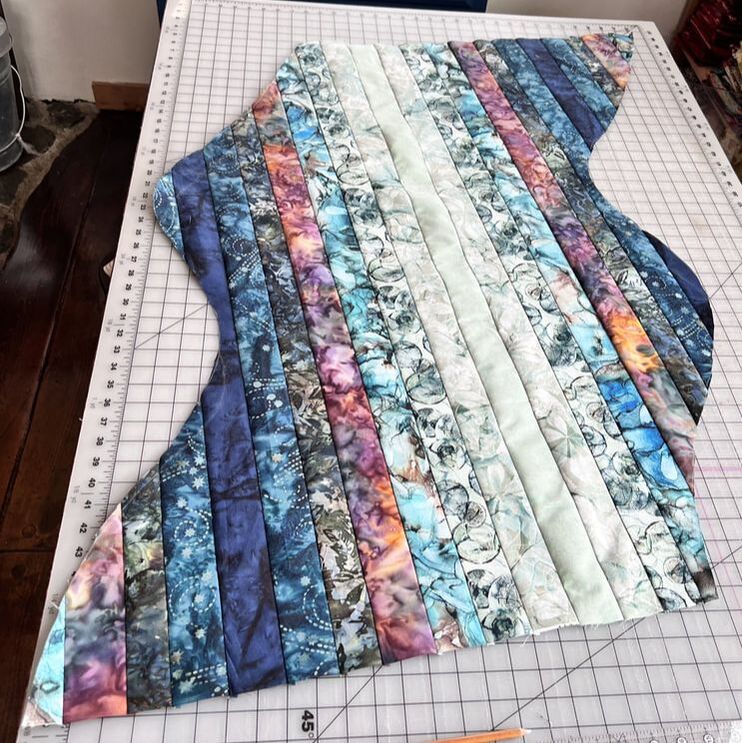
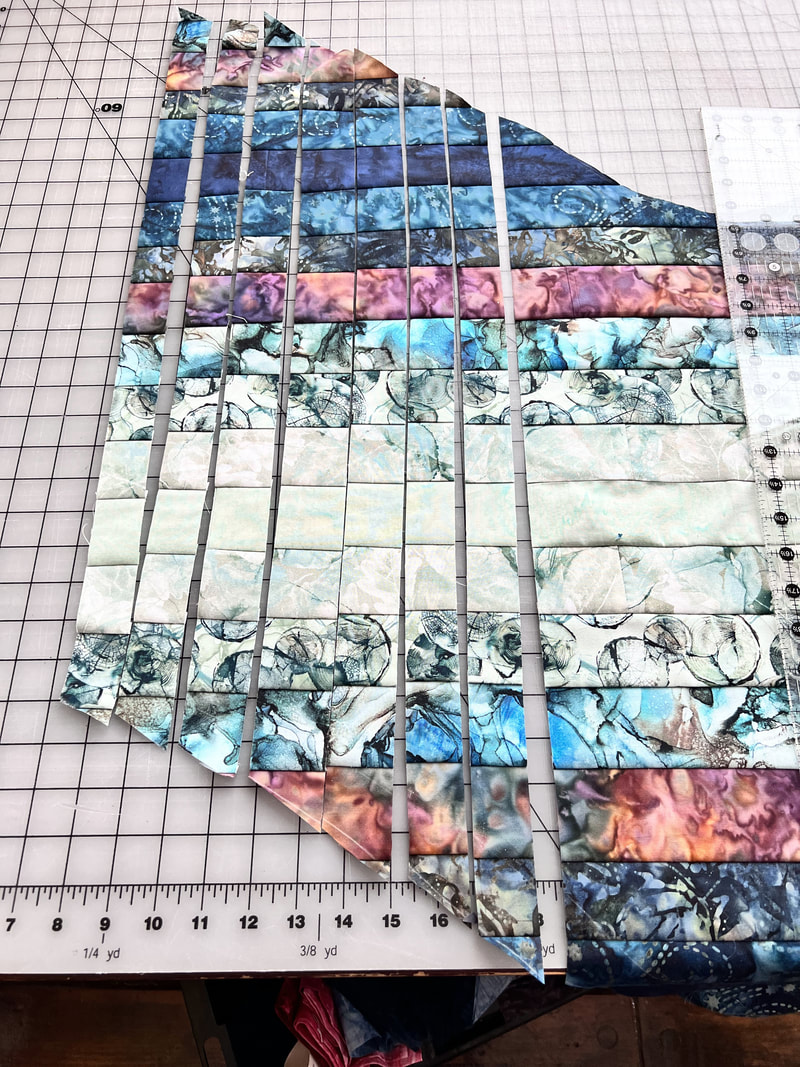
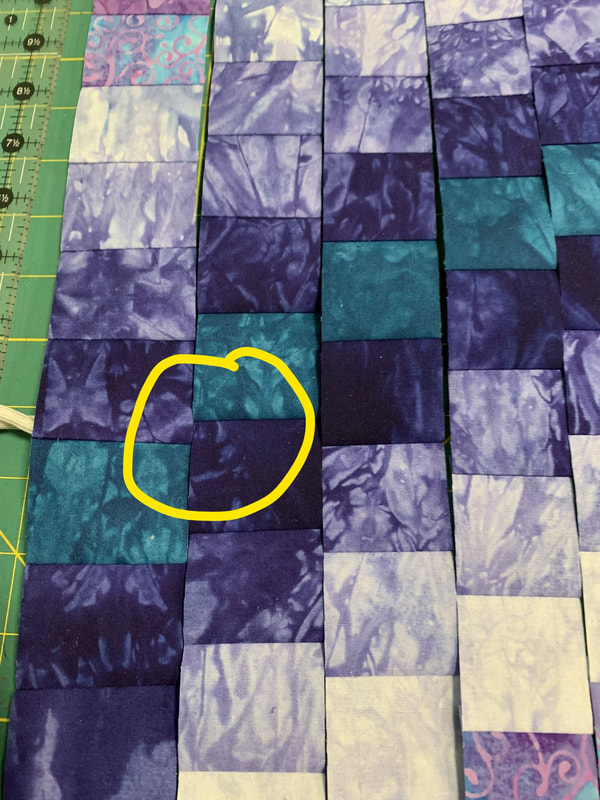
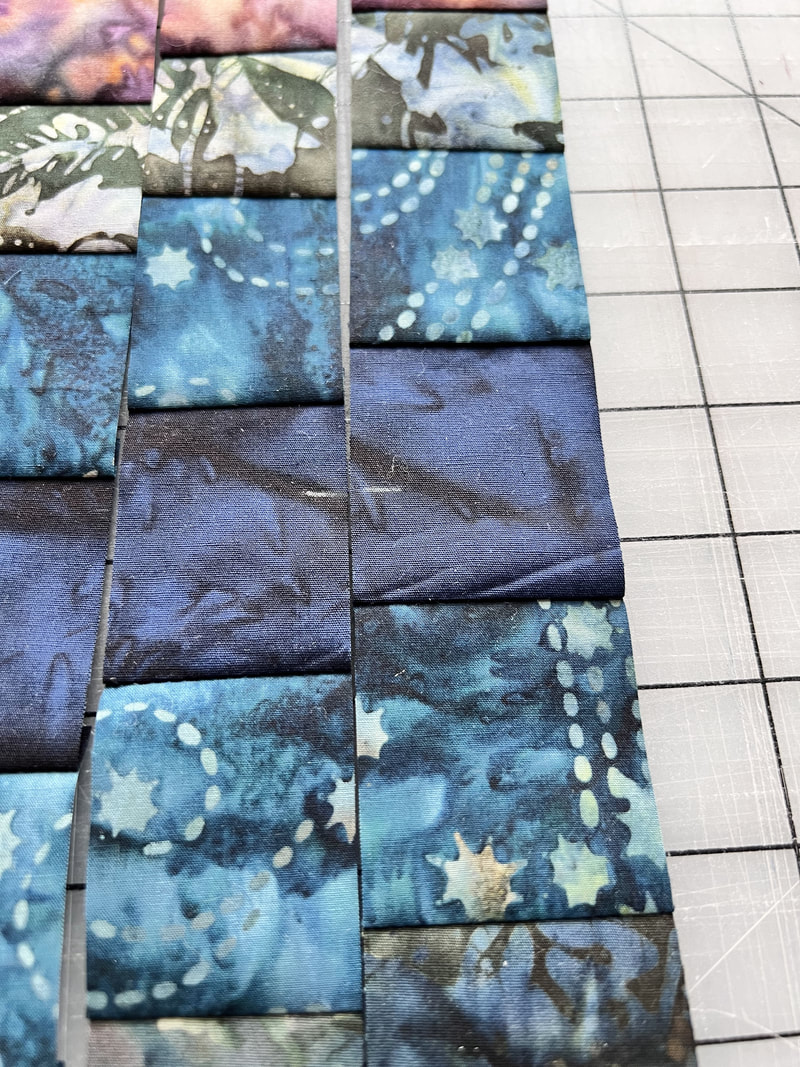
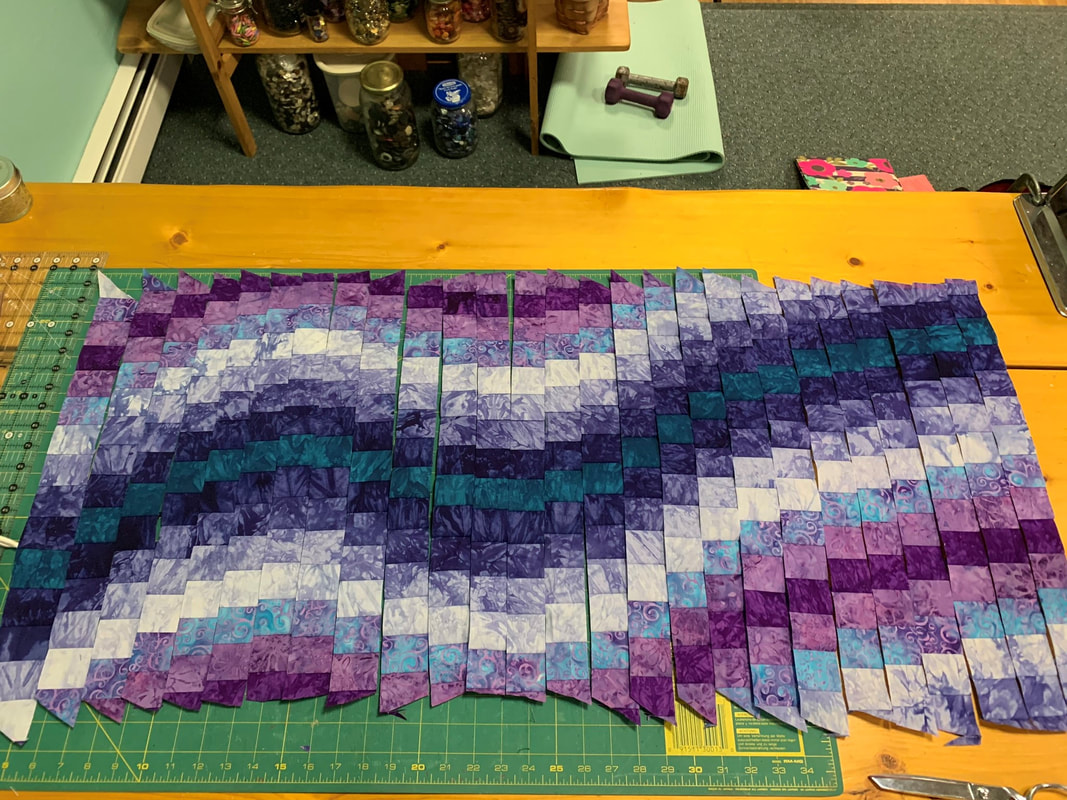
    The first picture below has a few strips in the middle that don't change much, so I scooched a couple of them up a bit. The second has one with too much change, you want matching fabrics to touch at least a little! (from my second version of this technique) Again, this has to do with how you cut the curve in the first place. The first one must have had too much of a flat spot, and the one in the second photo had too steep of a curve. But I just had to scooch one of those also. The third photo shows my first one 20 years ago where I didn't notice until it was too late! Blurry ancient photo, but if you look close you can see at least one spot where the line of purple is interrupted. I did the colors a bit differently on that one also, the method I did this week isn't the only option!
    In the last photo in this section, I show how I used chalk pencils to add a couple of registration marks on each pair of strips. This helped tremendously in attaching them together as you can't really go by the ends. 
Picture
Picture
Picture
Picture
All stitched together, and muuuch narrower! If I averaged 1 1/2" inch strips, I lost 1/2" off each in seam allowances, so a total of a third of the width. It actually went from 44" to about 24", so that's even more than a third, I must have had fat seam allowances... It will lose some on the top and bottom as well, since it has to be squared up. That started at 28" (14 times 2" finished strips) and looks like it will be about 24" after straightening the jagged edges. So my giant rectangle became a square! It loses a much smaller percentage from top to bottom. I was wishing I had used more dark strips, as those are what I'm losing the most of since they end up more at the top and bottom. And again, you don't have to do this arrangement of dark/light, that's just what I did. 
Picture
 I think my current one will get a raven, but I still have to finish it. I made this raven a few years ago partly from silk flower petals, but I think he's too big, and the color looks worse in person. Below are a few pics from my last version. It got a Teresa Ascone panel added to the front of it. It looks like I cut all of those strips the same size, so you can see what that looks like as well. Weird lighting in the last pic; I think I still have that quilt, I'll have to take a better photo... ​
Picture
Picture
Picture
Picture
   It's an unusual but fun technique, and I'm sure there are lots of ways to vary it. You can piece your original strips if necessary, but then you may have to trim off a bit when cutting vertical strips if a seam lands in an inconvenient place. This is about as wide as you can make it with wof strips though. I'm sure I'll post a picture of the finished quilt, follow my newsletter (sidebar) if you aren't, so you see it!. And let me know if you try it! Happy sewing, Beret
15 Comments

Quilted card gallery

10/6/2023

0 Comments

 
    This will be another short one as I have an open house tonight (local people invited, but yeah… several inches of fresh snow…😅), and class starting Monday! Usually at this time of year I’m in the mad rush to make quilted greeting cards for bazaars. It definitely feels weird to not be (just doing the Raven Art Show November 3rd), but I’m also very excited about doing the class instead! But I thought I’d include a link to a gallery of some of my cards from the past. The greeting cards are great for trying a technique, and you end up with something practical too. I think my grand total for 15 years is around 5,500 now! And hundreds of different designs over the years. I think I have 12 kits and maybe another 12 or so patterns, but that’s a drop in the bucket 😂 Many are inspired by a particular fabric, so aren’t really suitable for a pattern. But I hope these give you some ideas and inspiration! I have another batch coming soon, I hope, that will be very different from any previous ones, hmm… 😃
Quilted Greeting Card Gallery
Happy sewing, and local people, enjoy the snow, and if you don’t live too far away, I hope you will still come tonight, 5-8 pm, 2335 Nugget Loop, between Valatta and Ivory Jacks! Beret
Picture
0 Comments

    Beret Nelson's On The Trail Creations Blog Page

    Picture

    Beret Nelson

    I am a homeschooling mom of three fun kids, who are now old enough that I have a little time to pursue my passion for sewing! After several years of making quilted cards and art quilts, I'm now designing kits and patterns.  Some of my designs have been in Keepsake Quilting and Art Quilting Studios magazine! I  teach classes online, and am starting to do more traveling and teaching. I also have many tutorials, including some on YouTube. I am blessed to live in Alaska where I am surrounded by the inspiration provided by the beauty of God's creation!
    To see all of my patterns, click here.
    To follow my blog, sign up below to receive e-mails, and/or "like" my facebook page, button below!

    Free mini art quilt workshop for new subscribers!
    Picture
    * indicates required
    Picture

    "Like" my facebook page!

    I am also an independent distributor for Plexus supplements, since I credit them with enabling me to be healthy enough to do all these fun things! They target blood sugar and gut health, which are at the root of so many modern health issues. E-mail me for more info, or check out my website! I am as passionate about getting people healthy as I am about getting people creating :-)

    [email protected]
    or

    https://plexusworldwide.com/beretnelson
      

    Archives

    June 2024
    April 2024
    March 2024
    February 2024
    January 2024
    December 2023
    November 2023
    October 2023
    September 2023
    August 2023
    July 2023
    June 2023
    March 2023
    February 2023
    December 2022
    November 2022
    September 2022
    March 2022
    December 2021
    November 2021
    July 2021
    April 2021
    February 2021
    January 2021
    November 2020
    October 2020
    September 2020
    August 2020
    April 2020
    March 2020
    February 2020
    January 2020
    December 2019
    November 2019
    October 2019
    July 2019
    June 2019
    May 2019
    January 2019
    December 2018
    October 2018
    September 2018
    August 2018
    July 2018
    June 2018
    May 2018
    April 2018
    March 2018
    February 2018
    January 2018
    December 2017
    October 2017
    September 2017
    August 2017
    June 2017
    May 2017
    April 2017
    March 2017
    February 2017
    January 2017
    December 2016
    November 2016
    October 2016
    September 2016
    July 2016
    June 2016
    May 2016
    April 2016
    March 2016
    February 2016
    January 2016
    November 2015
    October 2015
    September 2015
    August 2015
    July 2015
    June 2015
    May 2015
    April 2015
    March 2015
    February 2015
    January 2015
    December 2014
    November 2014
    October 2014
    September 2014
    August 2014
    July 2014
    June 2014
    May 2014
    April 2014
    March 2014
    February 2014
    January 2014
    December 2013
    November 2013
    October 2013
    September 2013
    August 2013
    July 2013
    June 2013
    May 2013
    April 2013
    March 2013
    February 2013
    January 2013
    December 2012
    November 2012
    October 2012
    September 2012
    August 2012
    July 2012
    June 2012
    May 2012
    April 2012
    March 2012

    Instagram

    RSS Feed

Picture
  • Home
  • Shop Online
    • Collage Art Quilt Kits
    • Store - Wall Hangings/Table Runners Kit & Patterns >
      • Winterberry Wall Hanging
      • Up to Gnome Good Wall Hanging
      • Sandhill Sunset Wall Hanging
      • Moonshadows Wall Hanging
      • Moonlight Moose Table Runner
      • Serenity Wall Hanging
      • Autumn Leaves Table Runner
      • Summer Dragonfly Wall Hanging
      • Summer Dragonfly Table Runner
      • Autumn Leaves Wall Hanging
      • Moonlight Moose Wall Hanging
      • Night Owl Wall Hanging Quilt
    • Store - Quilted Greeting Card Kits/Patterns >
      • Greeting Card Panels
      • Acrylic Card Template
      • Trish Stuart Collection
      • Out On a Limb Card Kit
      • Wonder Lake Card Kit
      • Moonshadows Card
      • Raven Moon Card
      • Chickadee With Berries Card
      • Whale Tale Card
      • Moose and Willows Card Kit
      • Raven Card Kit
      • Wild Iris Card
      • Northwoods Nisse Card
      • Boreal Botanicals Card
      • Winter Trees Card
      • For the Birds Card Pattern
      • Wild Flower I Card Pattern
      • Wild Flower II Card Pattern
      • Wild Flower III Card Pattern
      • Wonky Heart Card Pattern
      • Whimsical Heart Card Pattern
      • Black-Capped Chickadee Card
      • Three Leaves Card Pattern
      • Let it Snow Card Pattern
      • Happy Birthday Card Pattern
      • Tundra Swan Card Pattern
      • Milepost Card Pattern
    • Store - Coffee Kuspuks/Quilt Panels >
      • Season of Hope Velvet Panel
      • Screen Prints
      • Coffee Kuspuk
      • Moonlight Moose Potholder Kit
      • Chickadee Menu Planner
      • Spring Flowers Coaster Pattern
      • Teresa Ascone Panels
      • Scrappy Baby Bib
    • Art For Sale
    • Molly Molecule Book
  • Online Classes
    • Simple Secrets for Art Quilting
    • Framed Collage Quilt Class
    • Crazy Quilt Greeting Card Class
  • Beret's Blog
  • 40 Ways
    • Videos 40 ways
  • About Us
    • Quilted Card Story
  • Favorite Resources
  • Tutorials
    • Grace quilt tutorial
    • Sewing Machine Needle Organizer Pincushion
    • Organza silk screen tutorial
    • Polymer Clay button tutorial
    • Birch Tree card tutorial
    • Coffee Shop greeting card
    • Free Motion Stitching Tutorials >
      • Free Motion Tutorial
      • 10 minute project tutorial
      • Valentine Coasters
      • Grape hyacinth postcard
      • Advanced free motion projects >
        • Sparkly 3D dragonfly wings
        • Inktense Frog quilt
        • Dream Big flower panel
    • Journal Cover - Book Tutorials >
      • Quilted Book Cover Tutorial
      • 1000 Gifts Journal Cover Tutorial
      • Quiet Book Tutorial
    • Tutorials for Our Kits >
      • Moonshadows Video Tutorials
      • Summer Dragonfly Video Tutorials
      • Serenity Video Tutorials
    • Video Tutorials - Screenprinting, Inktense, Quilted Card Binding
    • Pocket Prayer Quilt
  • Art Quilt Gallery
  • Quilted Cards Gallery
  • Fun Story
  • Contact Us
  • Sked Verks
    • Sked Verks Gallery
    • Sked Verks Online Store
  • Return Policy - FAQs