|
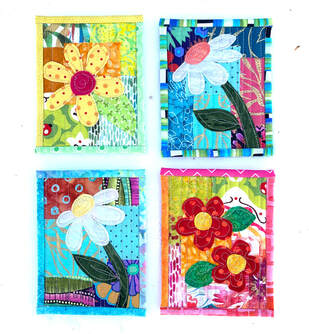
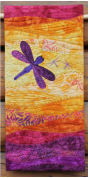
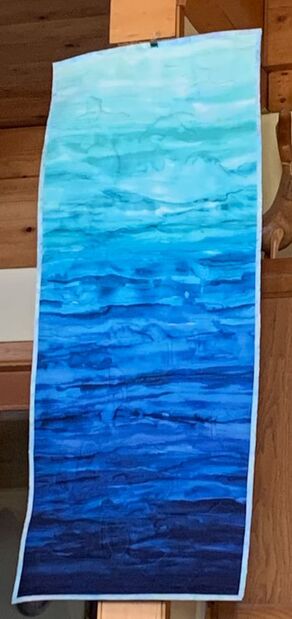
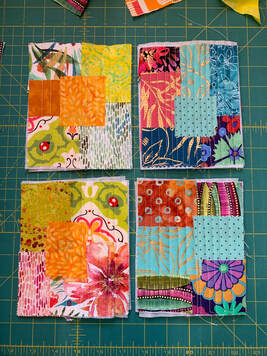
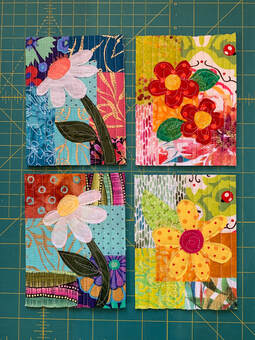
I recently participated in the online Raven Art Show sponsored by the Alaska Songbird Institute. I made a different shape of framed collage quilts than I had before, and they were really fun. (And they all sold quickly, plus I have several orders for more, hopefully I will keep making them to sell too!) I will update the class with some tips on making these. I also updated my gallery page, so there are lots more pictures there!
Framed Collage Class update, price increase coming November 29:
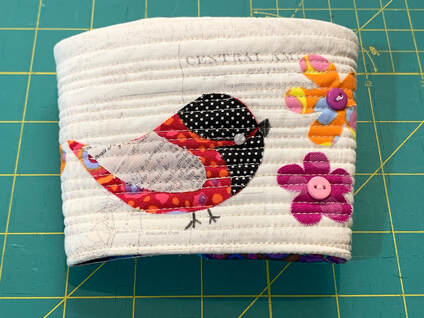
When I first made this class, it had four designs in it. It's up to I think 12 now, and I haven't added information on this newest batch yet! You can still choose to keep it simple and stick to the original designs, which are at the beginning of the class, or you can keep going and try some of the added ones. Or branch out on your own, which is always my goal! But because I have invested tons of time into adding to it, I feel that I need to raise the price a bit. It's still a steal for how much information it contains 😊, and is not overly expensive! You get permanent access to it. It was $35, and will be going to $49 on Tuesday, November 29, after black Friday weekend is completely over. So you still have 11 days to get the current price! These quilts are really fun, if you haven't tried it, I hope you will! Click online classes above, or here to sign up! If you are already in the class, look for an email coming soon with some other information about it. Also coming soon, a couple of my kits in the Keepsake Quilting catalog!
0 Comments
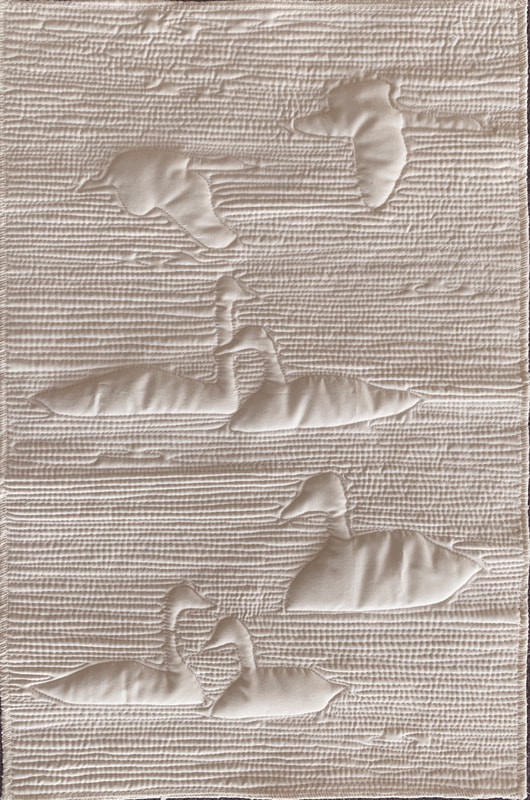
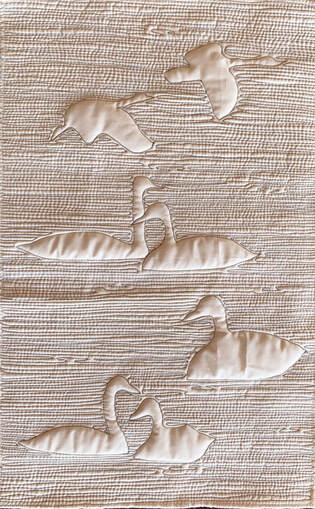
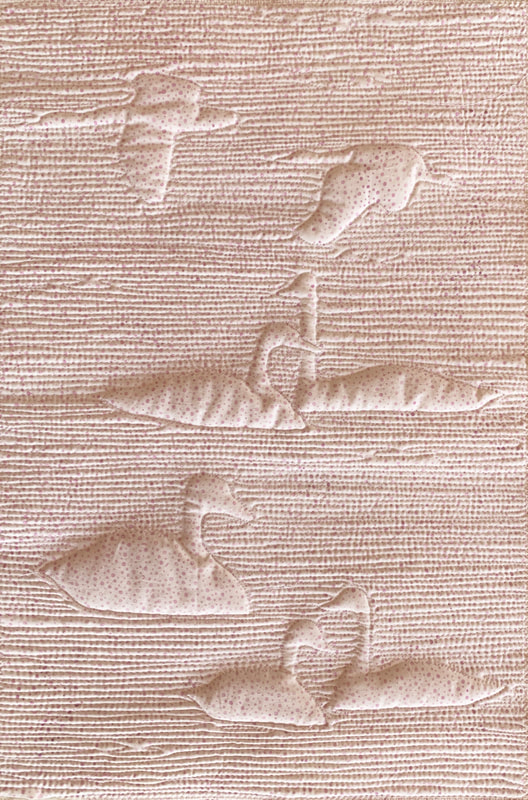
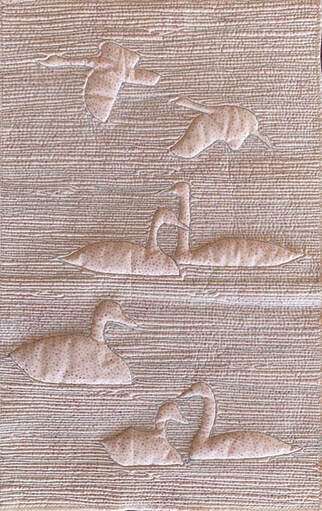
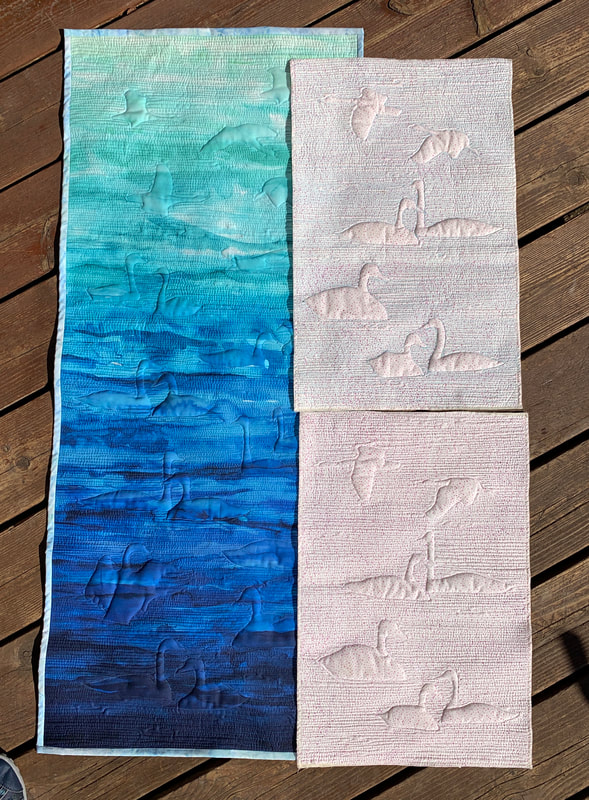
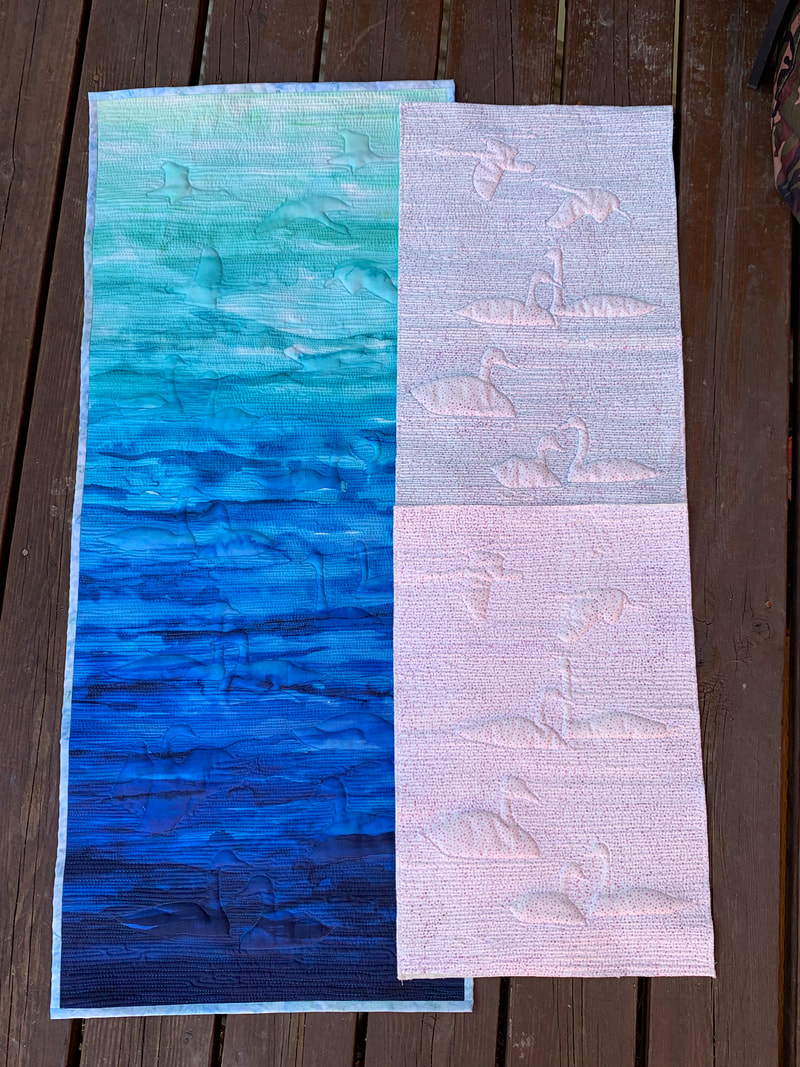
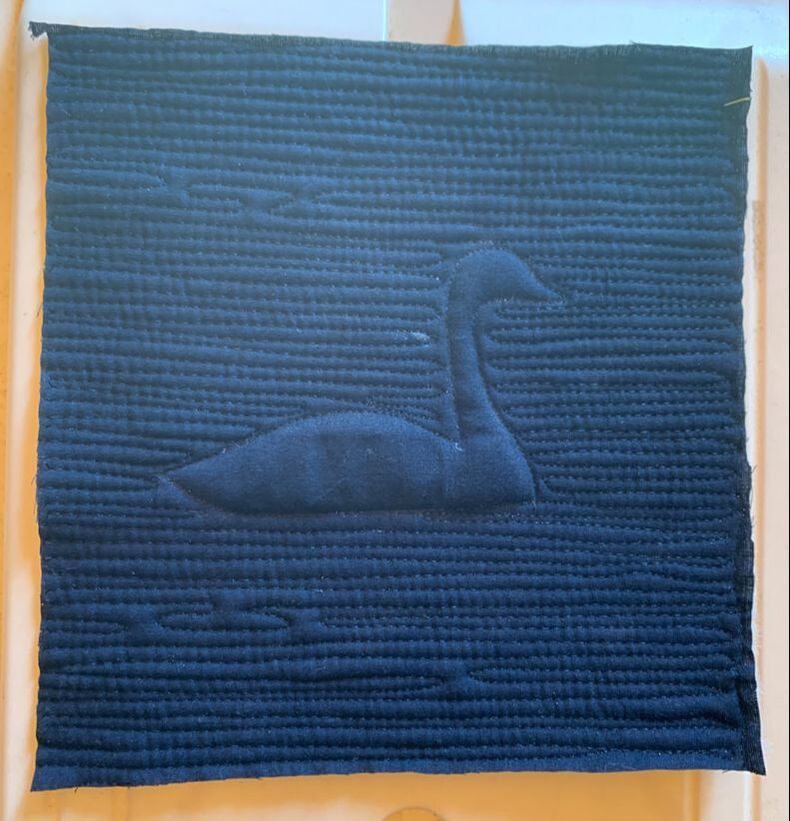
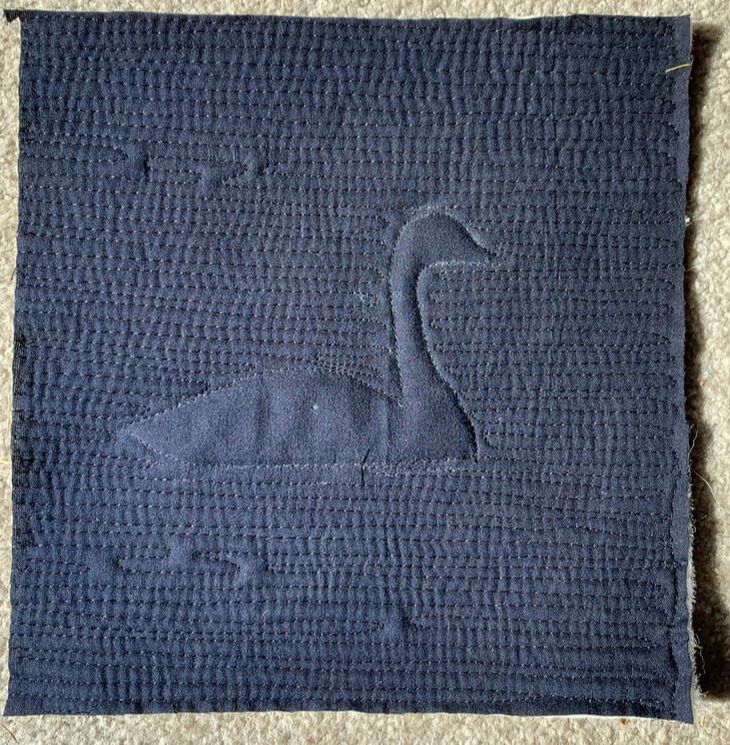
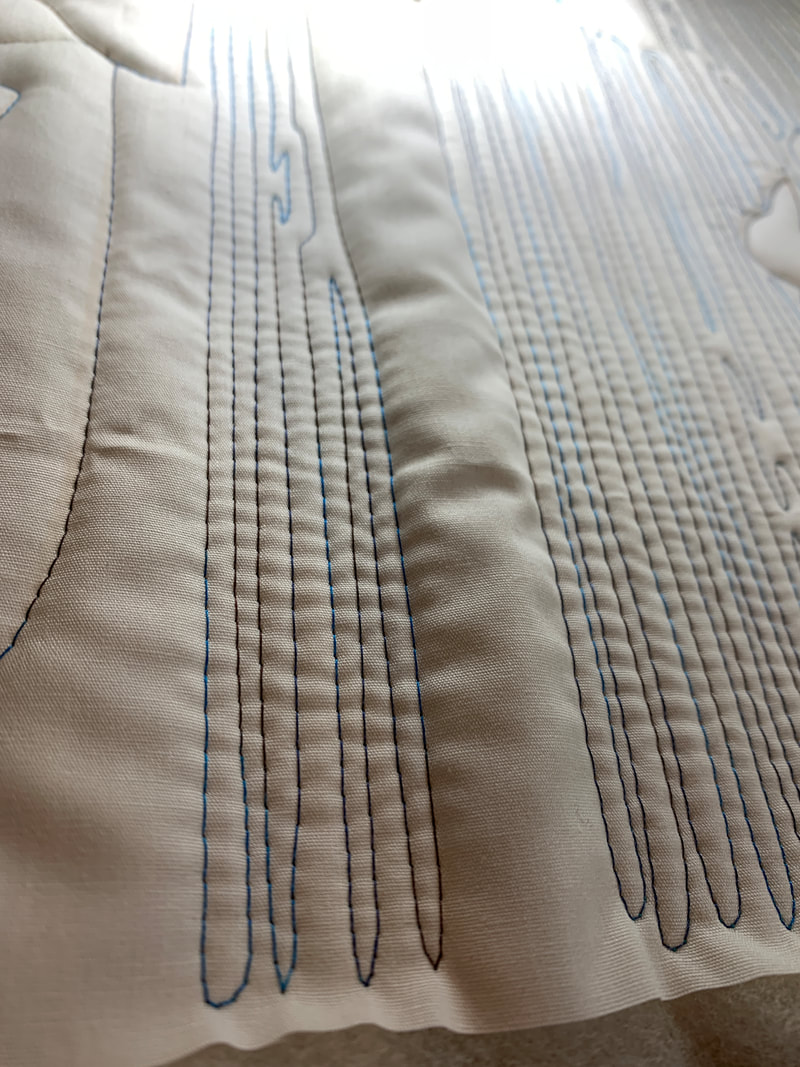
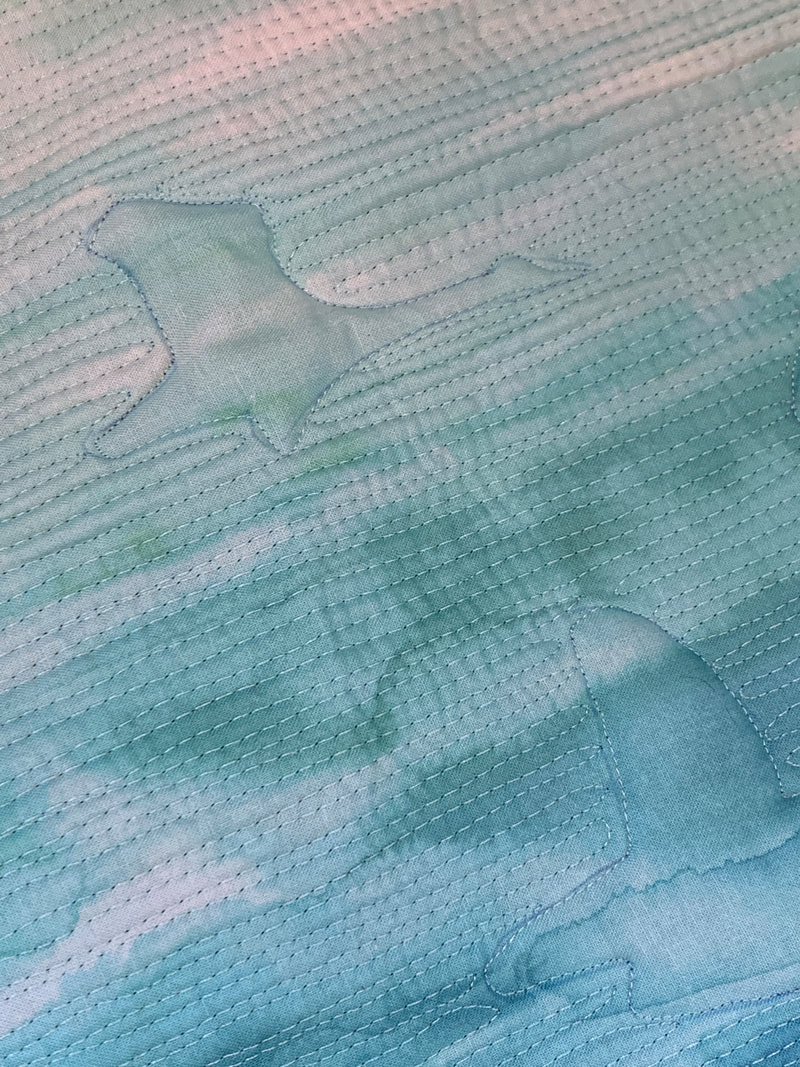
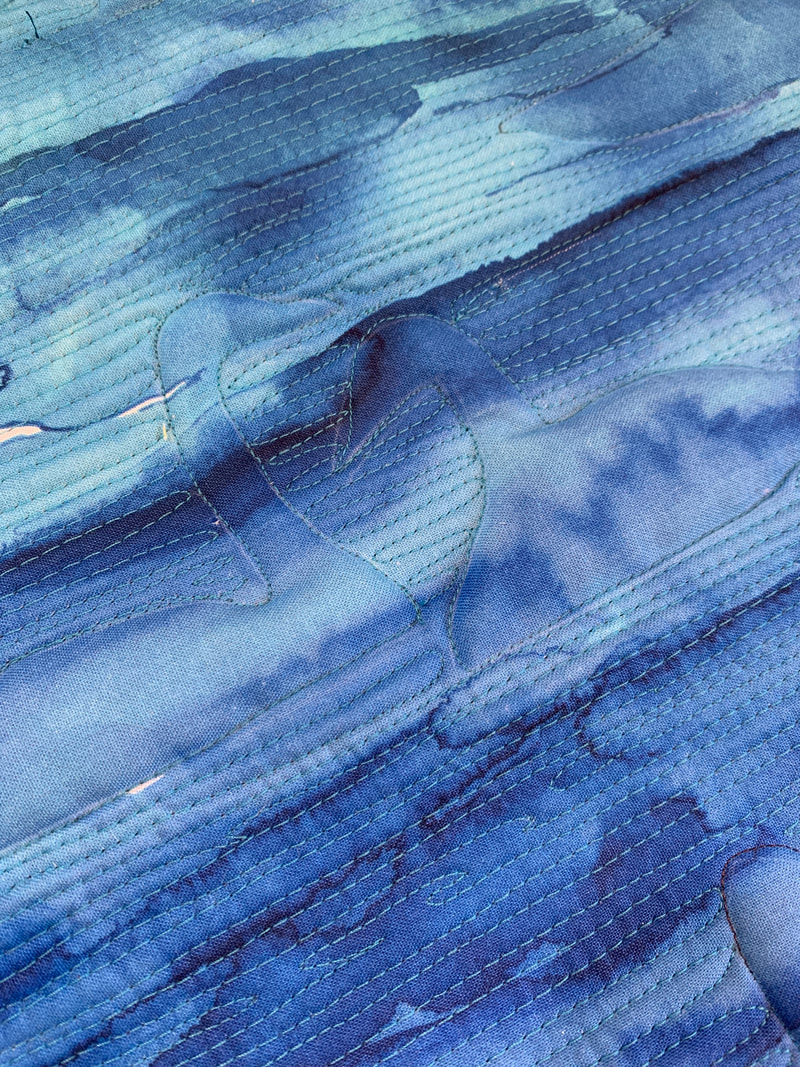
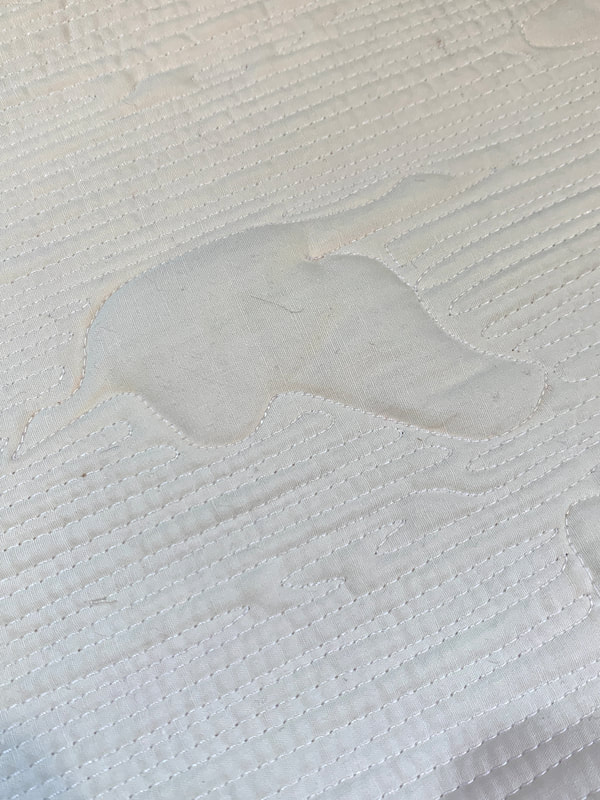
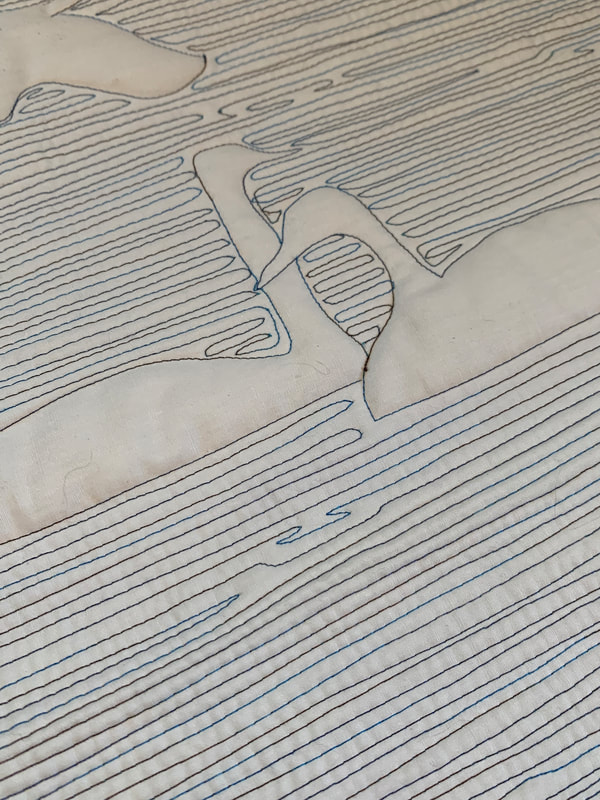
 I've had a little time to come up for air between a major wedding dress alteration and sewing my daughter's wedding dress, hopefully I will still be able to fit in a little art quilting during that one! These mini pocket prayer quilts have been popular on the internet recently. The idea is you give it to someone with a note saying to keep in in their pocket, so whenever they feel it, they remember God's love for them, or a Scripture, or whatever you decide to suggest. They fit in a greeting card, so they'd be a great addition to a quilted one! You could even make it match 😊 They're a quick, fun project, but also a little tedious! I came up with a way to make the process a bit easier, and it also adds a little pocket to your pocket quilt 😂 You could tuck your note into the pocket. There are endless ways to vary them, of course, but this is a quick way to make the basic four patch version. I hope you will try it, and happy sewing! Beret 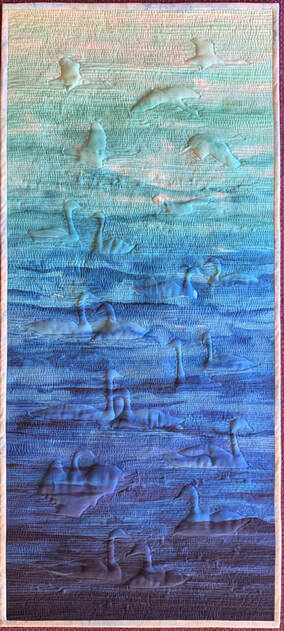 What started as a fun little project turned into a study on what makes quilting show up... I already knew that quilting shows much better on solid fabrics than prints or hand dyes, but this fabric was so pretty I decided to try it anyway... a project that is only quilting. If the light is just right, it looks ok, but if it's not? Then it's just a pretty piece of fabric hanging on the wall 😂🤦♀️ I also wondered if lighter or darker fabrics made a difference. So I made a few more samples to show you, or future students, what I'm always talking about in my free motion quilting classes! I used wool batting for extra loft; I will put in a couple of pictures to show just how puffy it was! I traced the swan shapes, which I had printed out and then cut out. (Tracing with a light box would have been smarter..🤦♀️.) I used 505 spray to adhere the layers, then started stitching. I outlined the swan shapes, then filled in the rest with matchstick quilting, 5-7 lines per inch. Still free motion as I wanted them a bit wiggly, and not be constantly turning around! Process photos at the end, I'll focus on the visibility of quilting first. All samples were done with a 40 wt thread, I'm sure the thread weight makes a difference too.
Isn't it amazing how the cream thread shows up almost as much as the dark? A little too much, like every little bubble! 😂 (I can tell I wasn't as careful on these two samples either...)
I also tried photographing all of them in bright sunshine. Usually more angled light helps the quilting show the best. The aqua one shows a bit, but the white ones show more, and again, very little difference between the light and dark thread on the white ones! (I used three shades of thread on the aqua quilt) 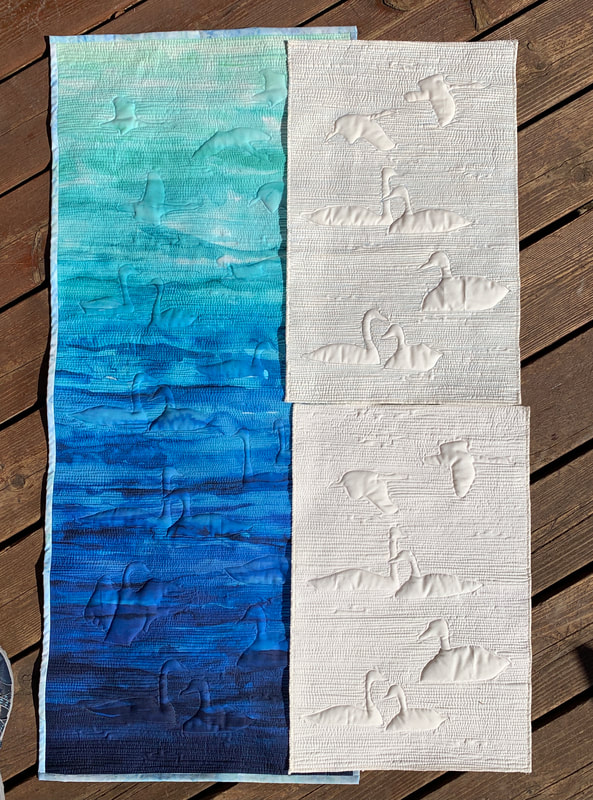 Now for the backs, at least of the white ones:
It's a subtle, even print, and it's in light with good shadows, so it still shows. In the photos below, I'm surprised the aqua shows up as well as it does in the bright sun. It's less in the shade for all of them. It still shows up better than I expected on the print, so maybe light fabrics do show better than dark... maybe the shadows disappear on the dark...
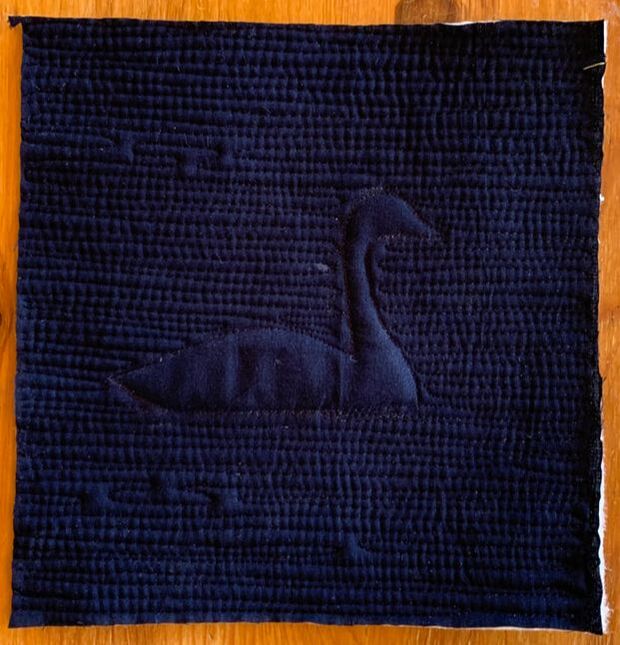
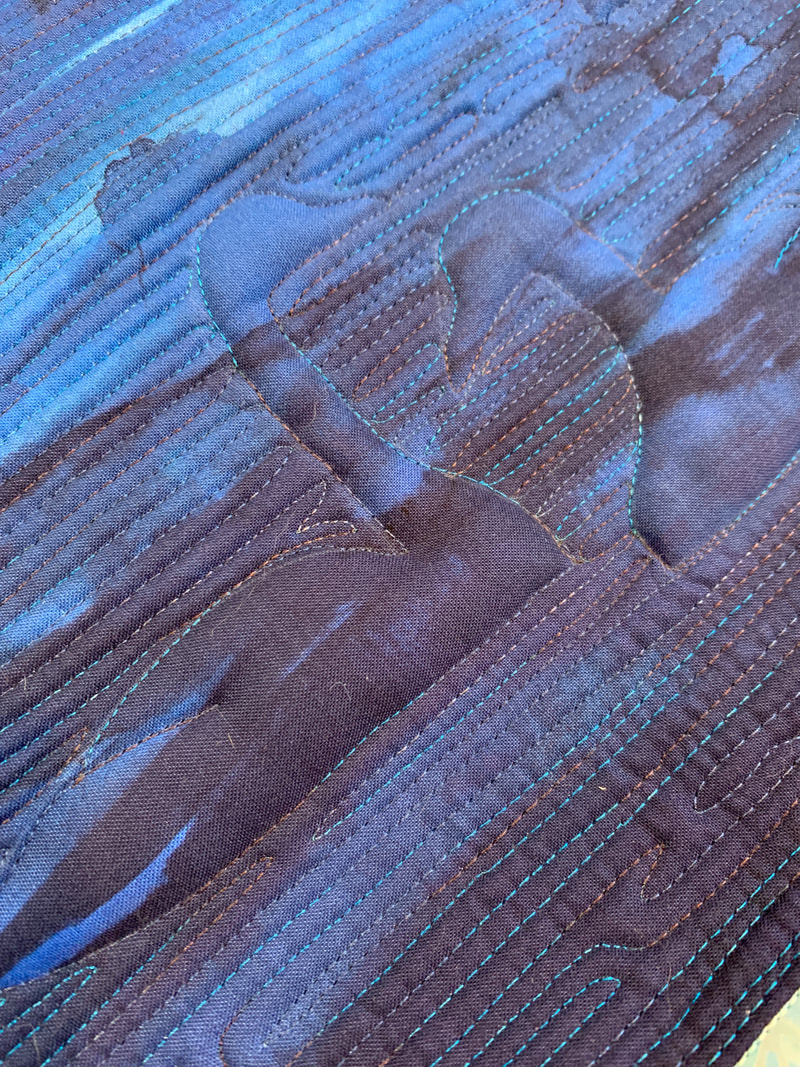
Here is the solid black sample, in different lighting.
So, while quilting shows up better on solid fabrics than prints, it also seems to show up better on lighter fabrics than dark. And the lighting when you take a photo makes all the difference in the world! And of course, a higher loft batting will show more as well. If you are learning and you DON'T really want your quilting to show, use lots of dark prints and a low loft batting 😂 What doesn't seem to matter as much as you would think is the thread color. Scroll down to see close-ups: the dark thread shows up well there, but not from any distance! Here are a few process photos: So much puff! It looked like it would never go flat, but it did. The quilting needs to be close together, and also go very close to the outlines of the shapes, or you will get a little ridge around them.
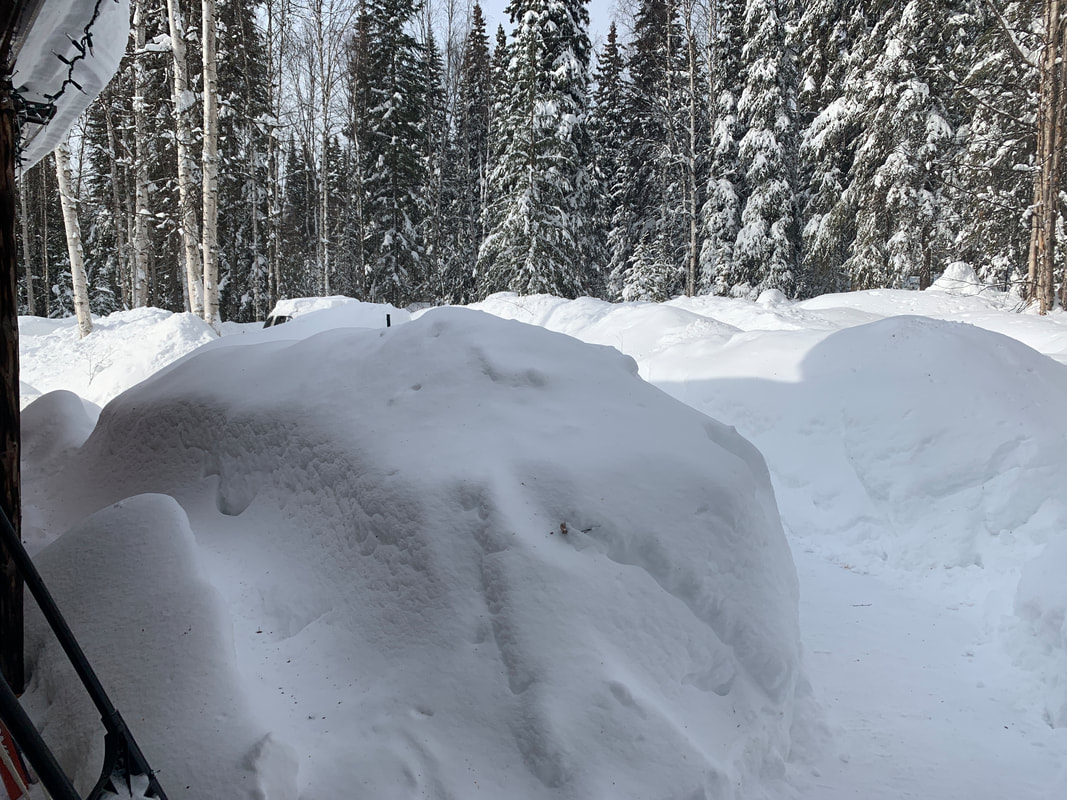
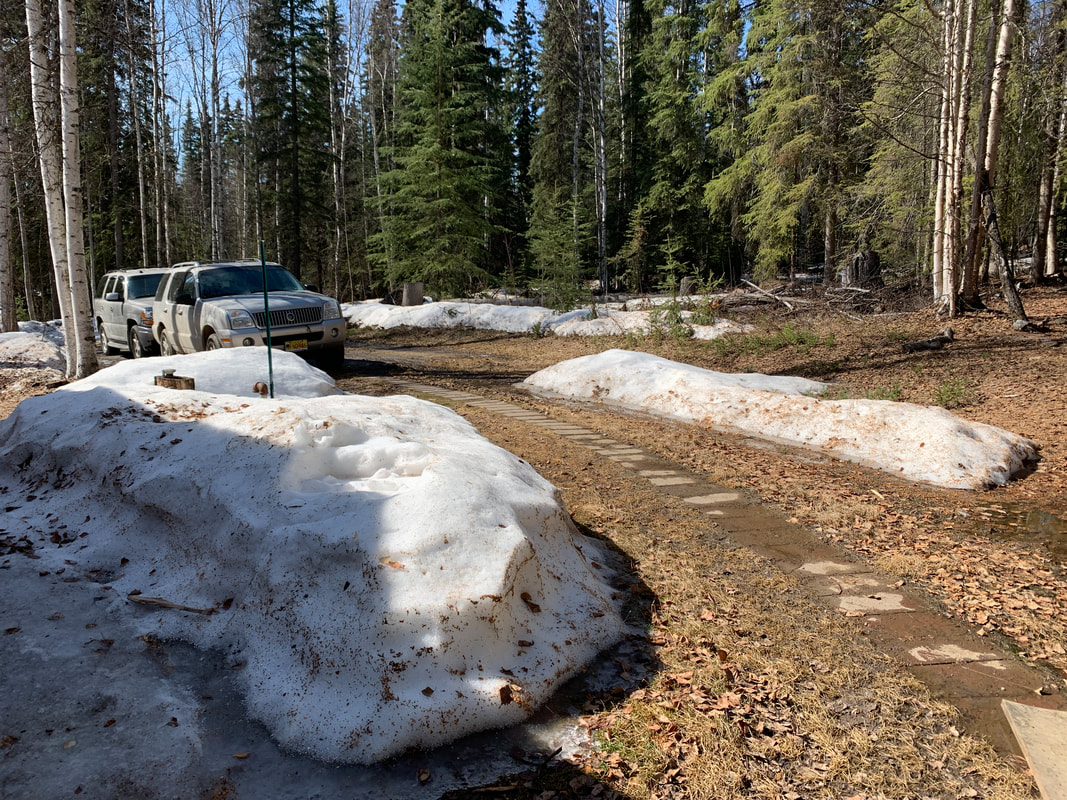
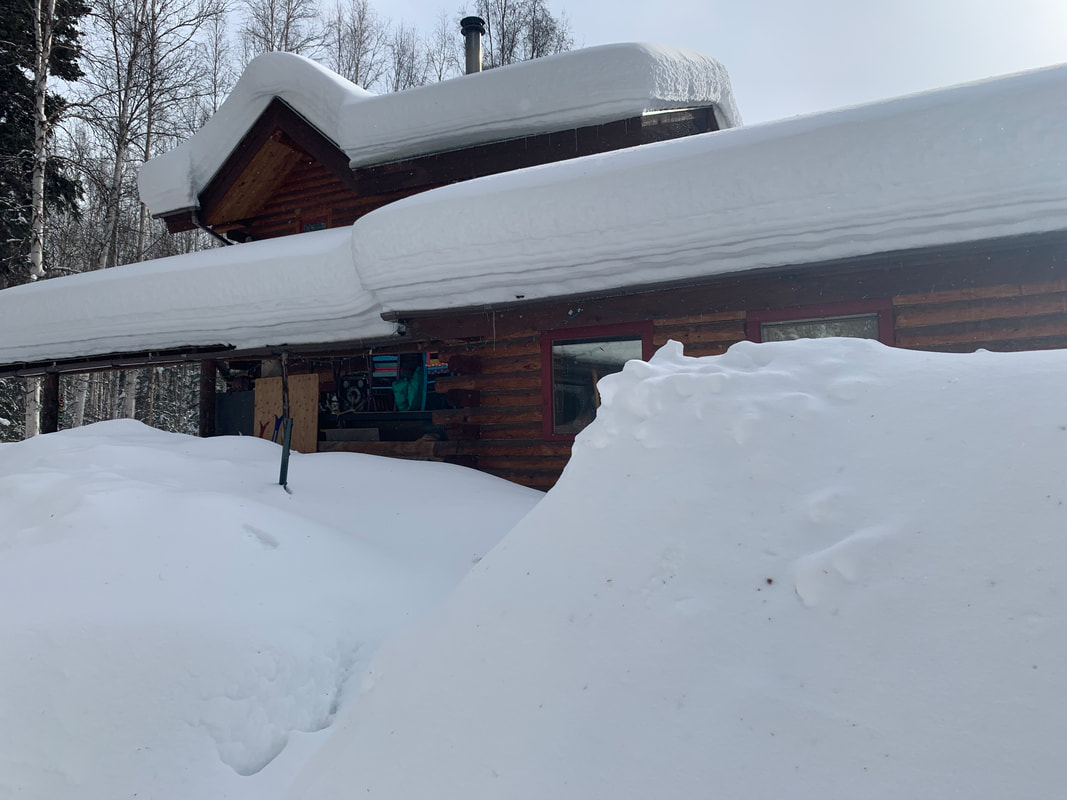
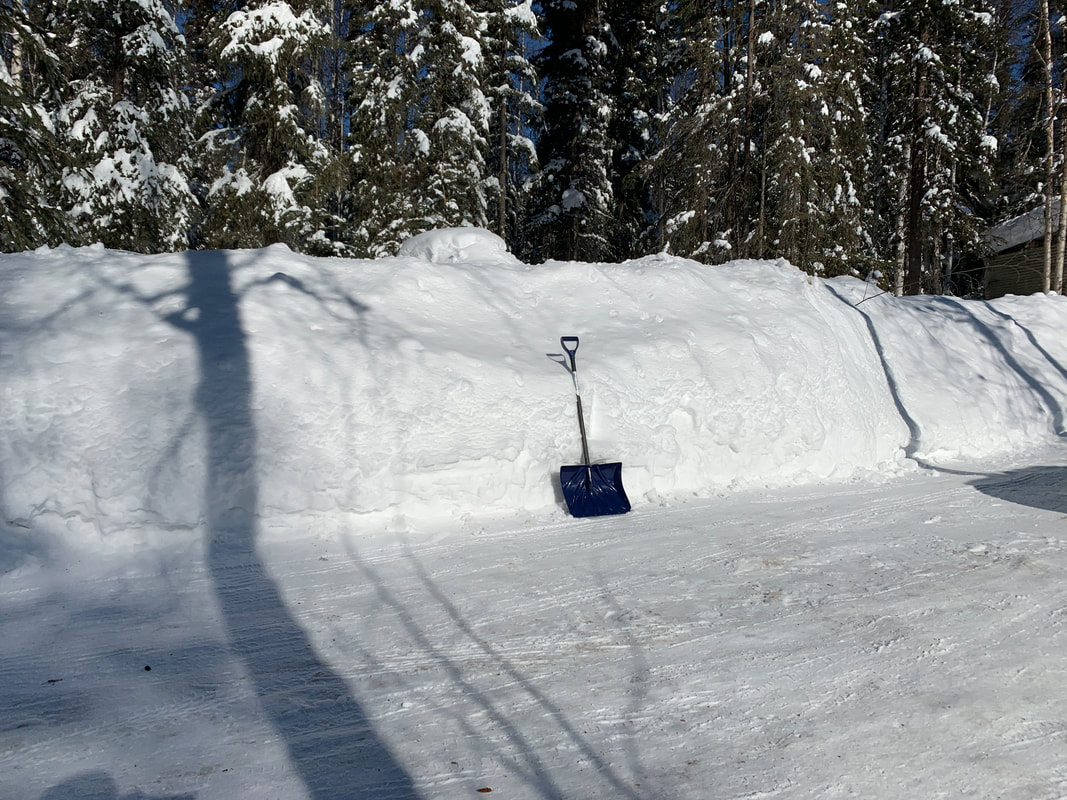
And, for anyone who made it this far, our crazy snow is melting so fast! It started warming up on the 12th and it's been spring ever since 😂 The first and last photo below are the same spot, our driveway... Happy Sewing! Beret
 Wow, it's been awhile again...not sure what happened! Anyway... I have a fun and quick project for you today. We're still buried in snow, which I love, (photos at the end) but somehow all of my recent projects have been very springy 😂 These greeting cards are very easy and quick!
I wasn't kidding about the snow... 🤣
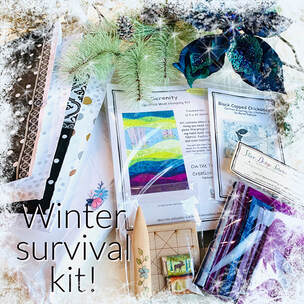 Winter Survival Kits
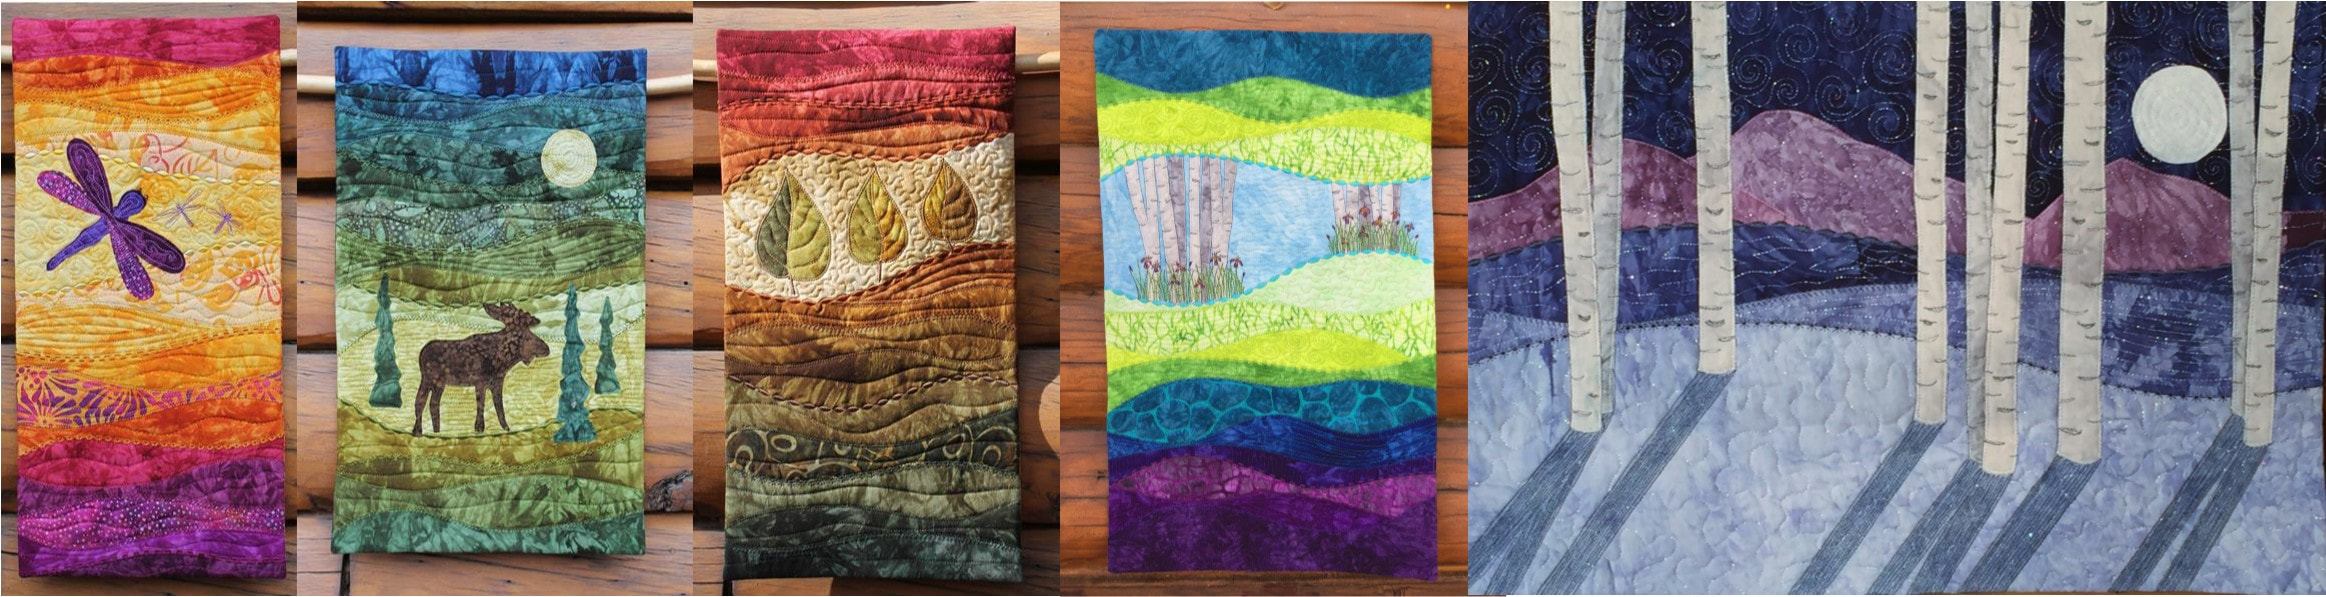
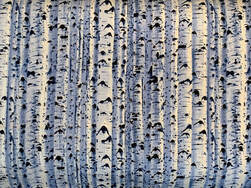
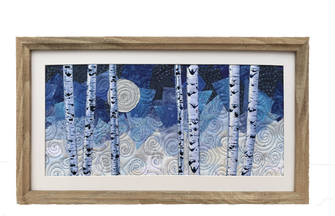
These have been a big hit, but the name turned out to be unfortunate, since much of the country was actually in survival mode for a few weeks! I haven't said much about them for a bit, since it sounded insensistive..., but hopefully you have all recovered your water, power, and a bit of normal life after the polar vortex 😢 I promised they'd be available until the end of February if supplies last (it will be close!) so that's four more days to take advantage of this offer! Here's what you get: 1. A wall hanging or table runner kit of your choice 2. A hand carved Alaskan birch point turner, handy for all of the kits 3. A full yard (by weight) of hand dyed fabric scraps from Starr Design Fabrics, $18 value 4. A 5 inch reclaimed barn wood quilt block to paint (our design choice) from The Reclaimed Nation 5. A card pattern (our choice) 6. A little treat with custom On the Trail wrappers 😊 The sets are $59 or $79 depending on which big kit you choose. Click here or on the photo to see your options, and happy sewing! Beret  I'm pretty excited over here, I've been working on this for a long time. The Framed Collage Class is ready to go! I hope you will design your own, but there are four different designs with specific instructions to choose from if you wish. I love the idea of this format, because I can keep updating it. For this first one, I made it self guided, there won't be any live sessions, it's much less complicated that way. You can work at your own pace and have permanent access to the class. Lots of text, photos, and videos, and a PDF file for pattern pieces. But if you take it, I hope you will join my Beret's Online Classes facebook group for questions and support! I'm working on another class too, so hopefully that won't be far behind. Introductory price, through this weekend only! The class will normally be $35, but for this weekend it will be $25. At this time, there are no kits available, choosing fabrics is part of the class! But while supplies last, I will have this tree fabric available in 1/3 yard pieces if you want to do that version. These are very fun, pretty quick, and very forgiving to make, I hope you will give them a try! Beret
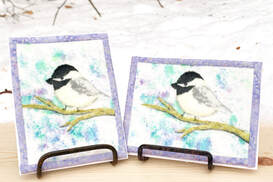 As usual, it's been way too long since I posted. I've been chipping away at my list of goals for the winter, but that one is still lacking 😜 I did, however, get a new card kit made, with my own chickadee artwork printed on velvet, which prints the colors really well. It's a very quick project, as all you have to do is a little quilting and then binding! The panel is square, so the card can be made in either direction. Click here to go to the kit! Out on a Limb card kit Also, I made a very short video that is an overview of the process for my wall hanging kits and patterns. (Most of them, the Sandhill Sunset is pieced like normal) Since my methods are a little unorthodox, I thought it might help to show that they are really not scary 😃 I hope you are still thriving and creating during this unusual season! Beret 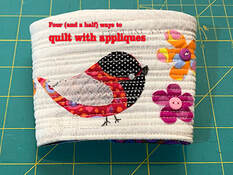 One of my goals for being home this winter was to do more blog posts with tutorials, and not just 'newsletter' updates. So, I'm finally doing one! I'm in a lot of quilt groups online, and I often see people asking how to quilt with appliques. There is no 'right' way, as there are some variables, which I will hopefully cover here. I'll show you four (and a half 🤣) options, so if you know of another, I'd love to hear it! For all of these examples, I used raw edge applique and machine quilting. Most of it translates to other types of applique, and hand quilting doesn't have some of the issues these methods are trying to address, but some of it still applies! Most of them also work with the 'quilt as you go' method. Option one: Quilt the background before adding the appliques. This is often the easiest, because you don't have to deal with the appliques at all. It's especially good if you want to use straight line stitching, as that would be extra hard to do while working around applique shapes. The drawbacks to this option are, one, you can get 'ghosting' of the quilt lines through the applique. (see second pic) With this one I had to bend it to get that to show, but washing may cause it to appear also. (But if that doesn't bother you, it's fine, no rules!) The second drawback is that you have to save all of the appliques until after the quilt is otherwise mostly done. Often people like to applique the individual blocks before even stitching them together, but you can't do that with this method. (Unless you are doing 'quilt as you go') With my designs, however, most of the stitching is done before the appliques anyway, so this would work fine, plus the wall hangings and greeting cards are unlikely to be washed.
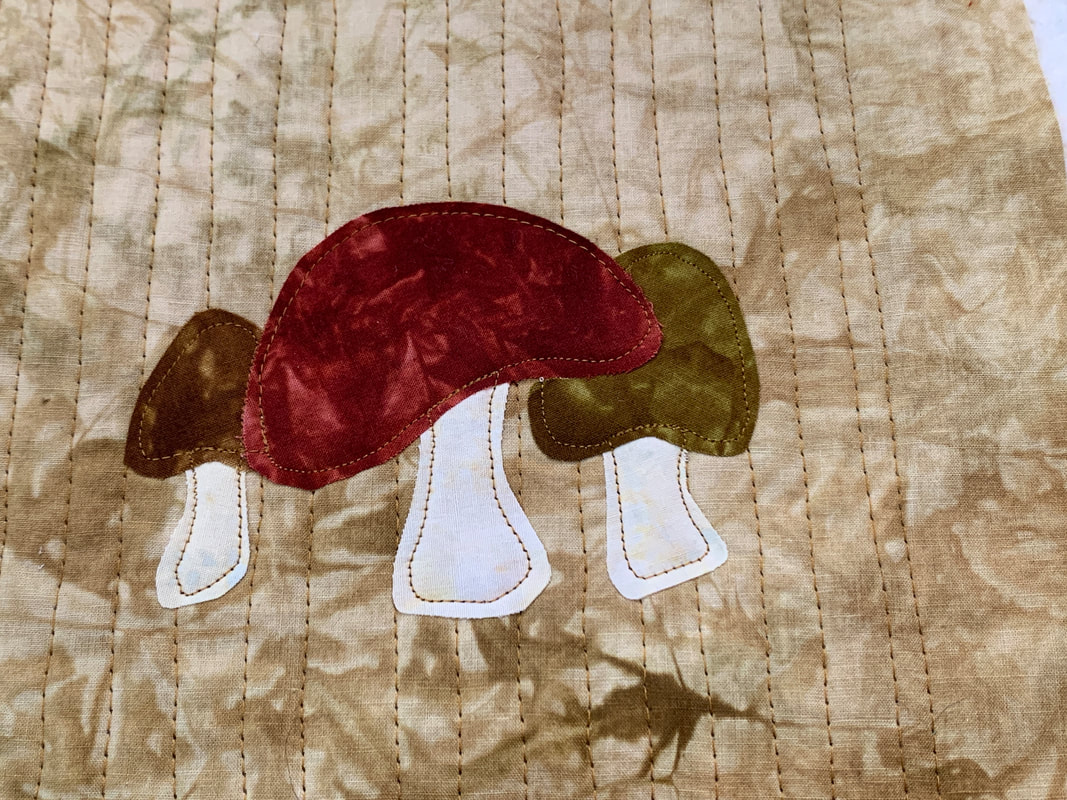
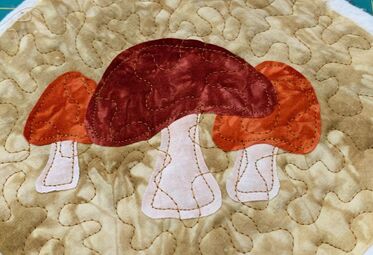
Option two: Quilt around the appliques after they are on. This solves both issues of the first method, but creates a new one. It can be tricky to quilt around the appliques, depending on the quilting design and the applique shapes. A simple free motion design like stippling is a good option, while something like feathers might be more challenging, or even just straight lines! You may have to make decisions like whether to quilt in that little space between the second two mushrooms, which I didn't in this case. Another benefit of this method is that the appliques 'pop' up a bit more than other methods, almost a trapunto effect. 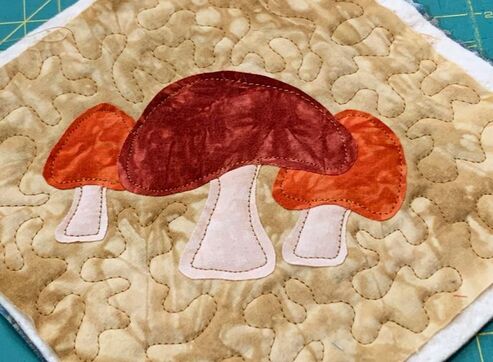 Option three: The next option is to quilt both around and on top of the appliques. This is especially important with larger appliques that are too big to be left unquilted. If you echo quilt, or something that complements the shape, it becomes part of the design. 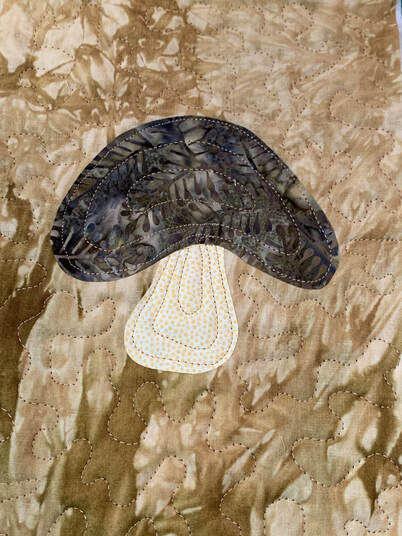 Option three and a half: A related option is to quilt an overall quilting design right over the top of the appliques. In my first sample, it would look better if I had used matching thread to stitch around the applique shapes, because it's competing with the quilting. I left it in to show you something to watch out for! Or needle turned appliques without visible stitching, or maybe appliques stitched with invisible thread would be good candidates. I could tell it wasn't my favorite method, because my brain had trouble doing it🤣 Longarm quilters are probably used to it!
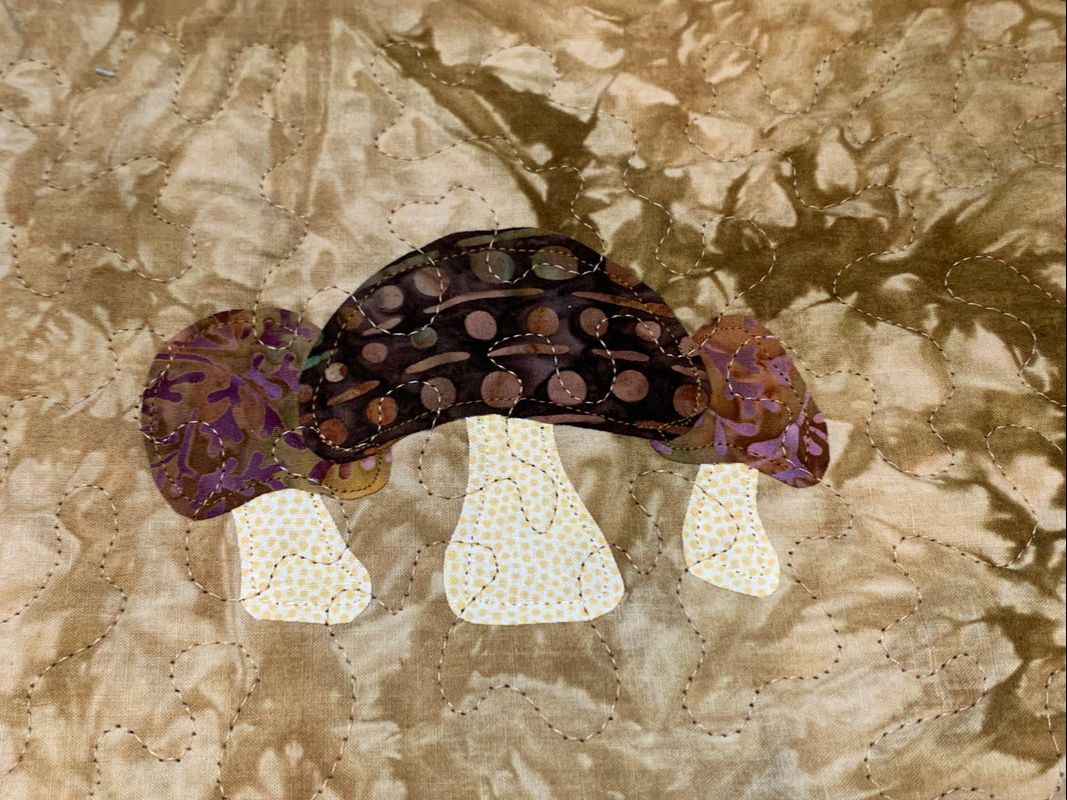
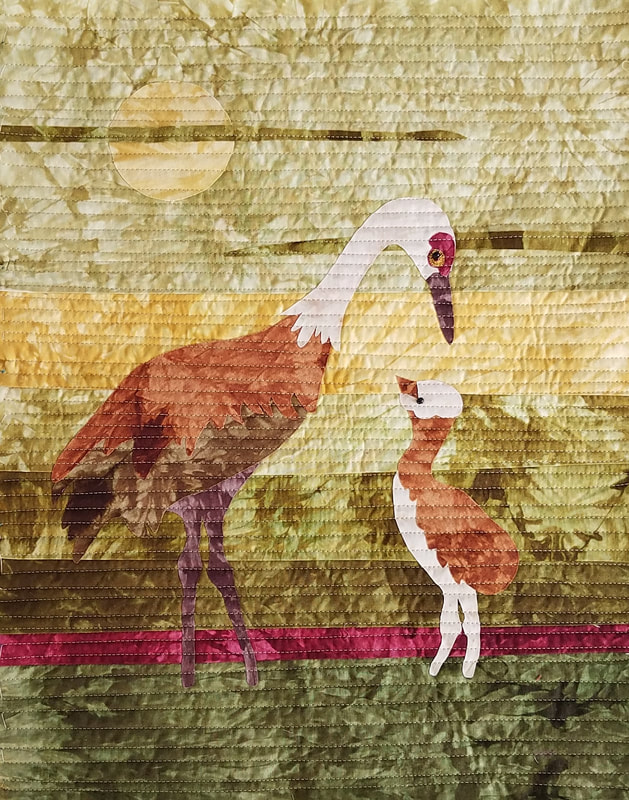
Option four: This one is a relatively new discovery for me, I saw it online somewhere as a good option for kids, which I have found to be true! But it's not just for kids, I have definitely used it myself :-) It's similar to option three in that you quilt over the top, but with matchstick quilting (close lines). This eliminates the need to do any stitching around the applique pieces, which is great for beginners, or just to save time. It's always amazing how much the thread disappears. On each of these examples, I only used one color of thread. For the crane, I used the color of the head, since that was the part I least wanted dark lines to show on, but the light ones don't really show on the dark. I should try one with dark thread to see what happens! The lines show, but not really the thread color. The drawback to this one is it makes for a stiffer quilt. That's fine for a wall hanging, but maybe not for a snuggly quilt.
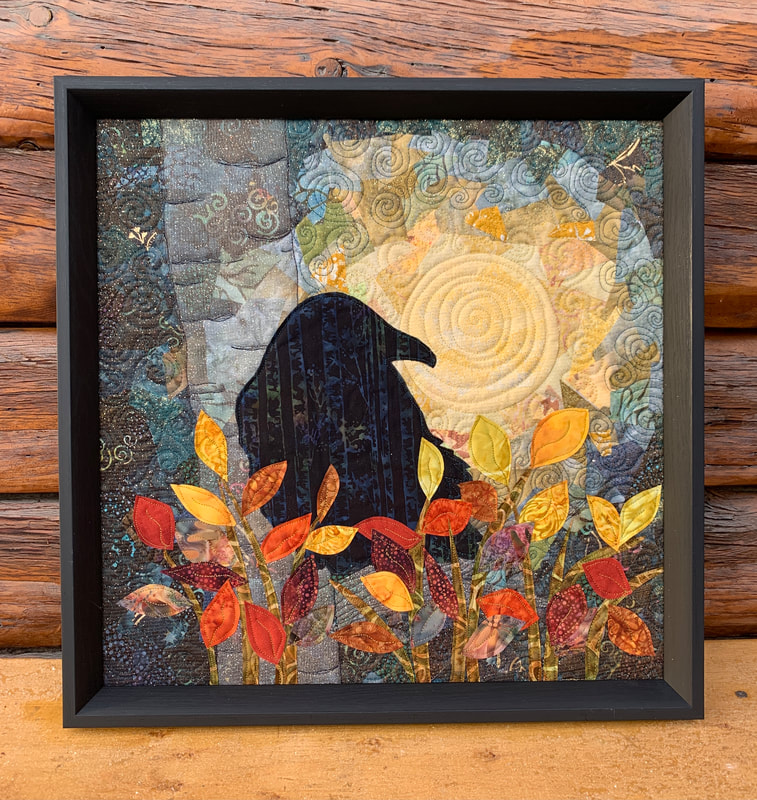
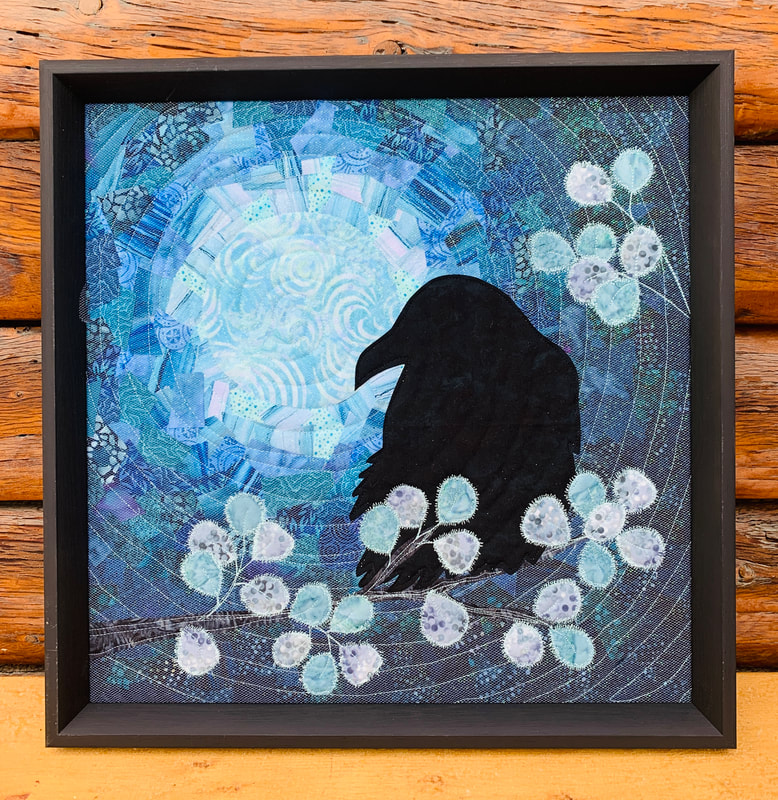
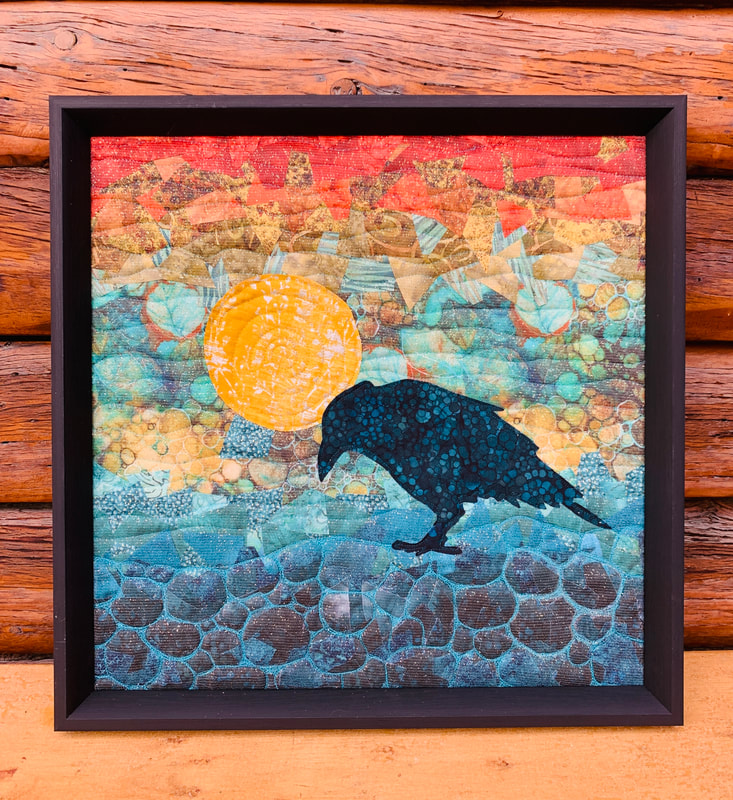
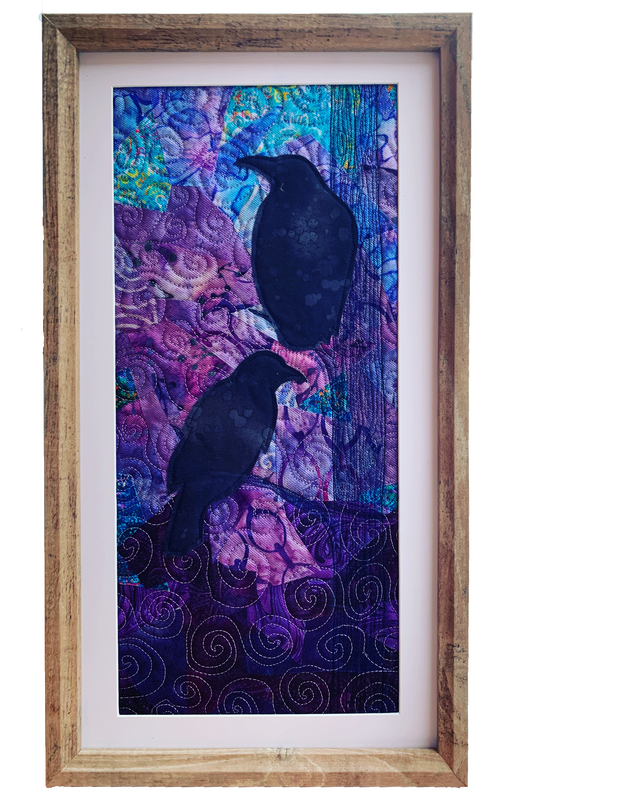
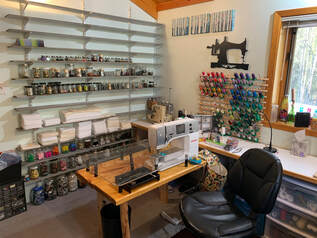
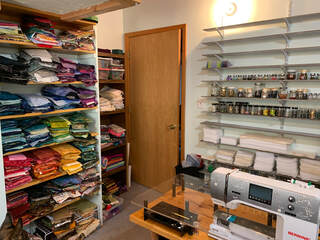
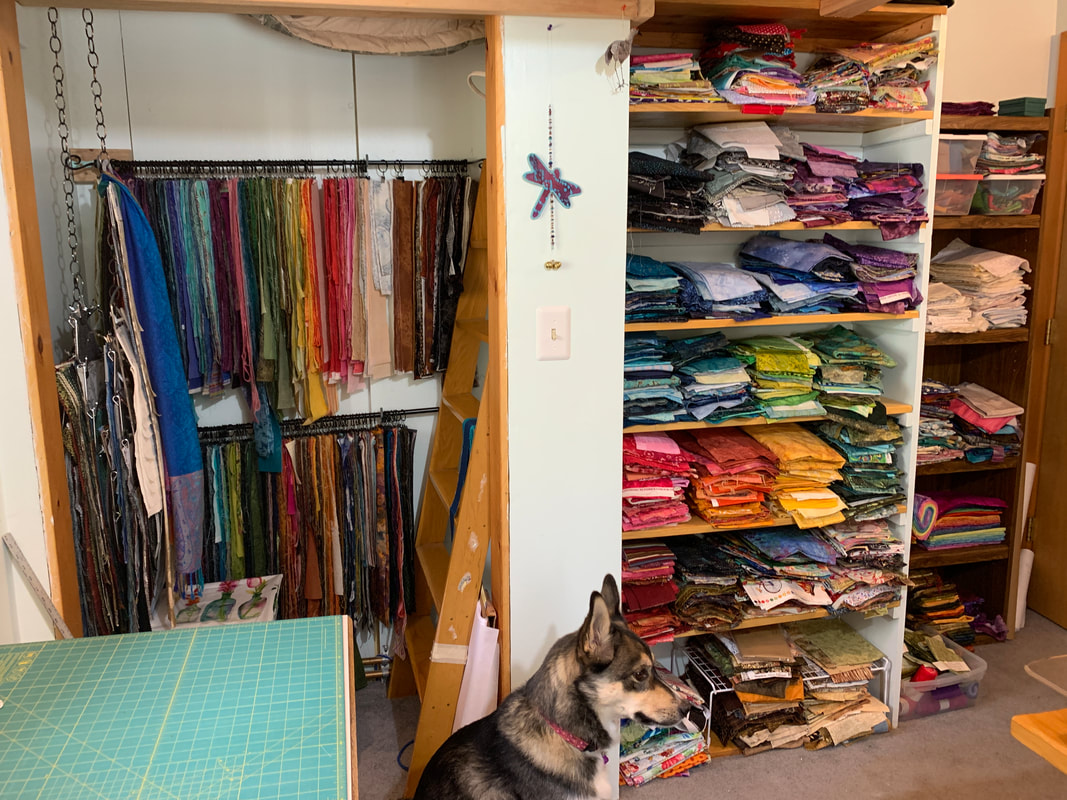
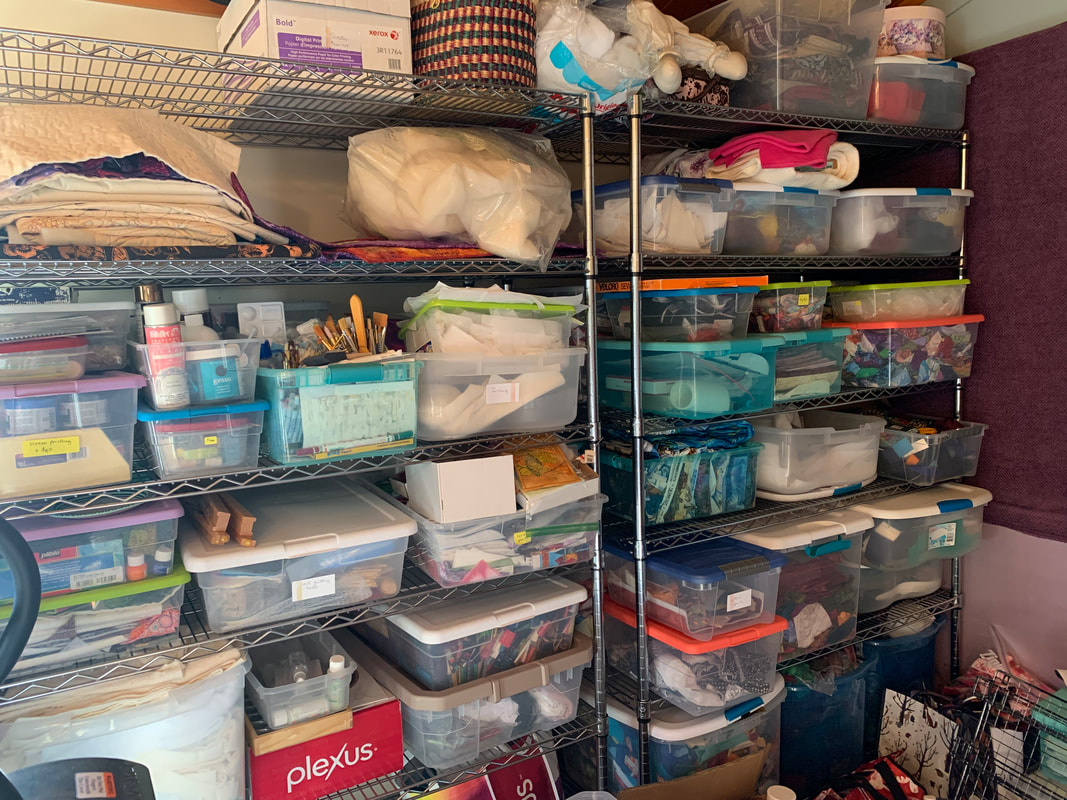
As I mentioned at the beginning, there is no right way. It depends on a lot of things... what the quilt will be used for, your skill level, and what you want it to look like, to name a few. I hope this was a helpful explanation of the most common options. If you have another, please let me know! And of course, check out our kits and patterns (click photo below) while you are here! Happy Sewing, Beret  Since the world went crazy, I don't have any bazaars scheduled for this fall. So I'm very excited to be participating in the Raven Art Show 2020, which is being done virtually this weekend, so you can attend from wherever you are! Some of the proceeds will go to support the Alaska Songbird Institute. There are lots of great artists participating, I hope you will check it out. Items will NOT necessarily be all raven themed. To attend, join this facebook group, which will just be for the weekend. https://www.facebook.com/groups/ravenartshow2020/ New items for sale will be posted at noon every day from today through Monday the 9th. I have several going up today! Here is one sneak preview: Midnight Ravens I hope to see you there! Beret 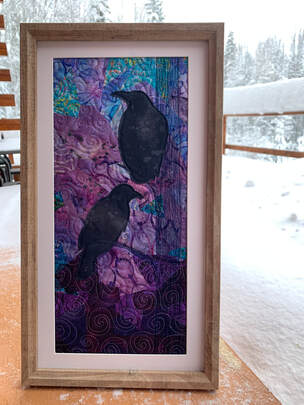 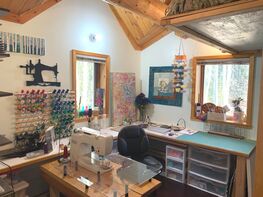 I've almost always lived in small houses/cabins, and usually haven't even had a designated room for sewing. Then for the last five years, I was blessed with crazy amounts of space! Now I'm at least temporarily back to MUCH less space, from 1500 sf down to about 330, and that is split between three places! My son's vacated bedroom is now my sewing room, (about 80 sf) a storage room in our previous building is storage and kit packing, (220 sf, we're calling it The Warehouse as we are Warehouse 13 fans🤣), and some shelves in our bedroom has more storage. (about 30-40 sf) So I have had to refresh my memory on all the things I've learned about maximizing space, which has always been an interest of mine. Here is an interesting quote I heard years ago, not sure where: "Time, Space, Money-you can have any two, but it will cost you the third." Focusing mostly on space in this post. But I get excited when I find solutions that cover all three! I read a home organizing book years ago that I still reference now, it had so many great ideas! And not just ideas, but the principles behind them, which I appreciate. The book was called "Confessions of an Organized Housewife" by Deniece Schofield. Here are a few tips I remember in particular: 1. Store things where you first use them This is kind of obvious, and yet we don't always do it. Most of us DO keep our rulers and rotary cutters by our cutting table, and thread and seam rippers near the sewing machine. I also keep fusible web near the iron, since that is generally where I use it first. I planned my sewing machine area to have the things I use the most close by. 2. Things should be easier to put away than get out. For example, if you have a big stack of boxes, ranging from larger on the bottom to smaller on the top, getting the bottom one out is not impossible, but putting it back requires an extra step. If the boxes were the same size, you could put it back on top, increasing the likelihood of it actually happening. We have more motivation to get things out, since we need them, but putting them back needs to be easy. My fabric is folded and sorted roughly by color, and I can always put it back on the top of the pile when I'm done even if it came from the bottom.
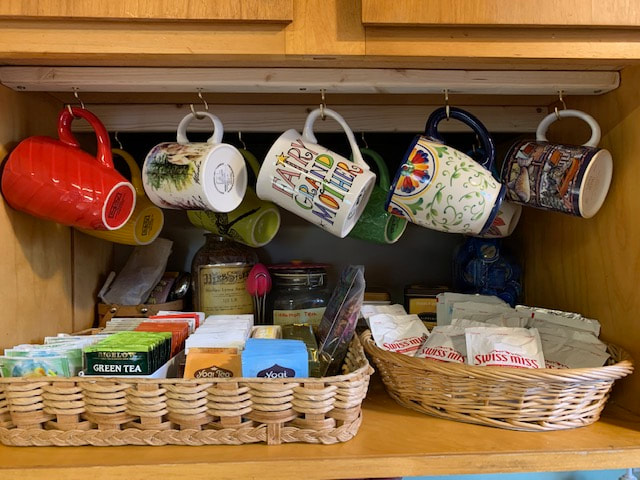
3. Have 'centers' for different activities Quilters are generally pretty good at this one too, a cutting area, an ironing area, a sewing area, etc. I'm using a mini iron and ironing board by my machine, and the big iron is in my bedroom, much less convenient... But usually the mini one is enough so far! 4. Prioritize items and store accordingly The book even recommends giving things a value, like A, B, C, and D. "A" items get stored between hip and eye level, and ideally not behind or under something else. "C" items can go on a high shelf or in another room. (I think "D" is get rid of it!) Make sure something isn't seldom used simply BECAUSE of how it is stored though. 5. Try not to store things more than two high or two deep when possible/minimize motions required to get or put away. Again, try to make them easy to get out AND put away, but easy to put away is the priority. I get pretty excited about things like my button shelves where I can get and put away any jar without moving another one! Normally I wouldn’t like to use up a whole wall with shelves that are only 5 inches deep, but that’s all I had room for here anyway, so it’s great. Even in my big studio most of the buttons were in boxes, so this is fun! My rulers are in a holder so I can get each one without moving others, and my “Stash n Store” (lime green) by the sewing machine is better than the rummaging in a drawer I used to do for those items. Books are a good example of things that are stored well. (Really, anytime flat things can be stored vertically, they are easier to get at and put away, like extra cutting mats). 6. Store things in containers when possible You can usually fit a lot more things in a space if things are contained. And you only have to move/grab one box instead of 30 tubes of paint, etc. Just try to make sure there is no wasted space in the containers, find as close to the right size as possible. And while I love my button jars and shelves, in that case I am ultimately choosing saving time over space. My buttons would all fit in a bucket without the containers, but yikes!🤣 I have a box in the windowsill above the cutting mat that has cutting and marking tools in it so those are contained and accessible. 7. Look for wasted space Often we have a lot more space than we think we do! Places to look for wasted space are: containers that are too big, shelves that are too tall, wall space above furniture, space under furniture, round containers instead of square. We don’t have to be OCD about it, sometimes we need empty spaces to function also. But if you need storage space, there are often ways to find it! I wanted my button shelves to be adjustable for that reason. I’m still working on that wall, but I’m sure there will be some rearranging of jars and shelves before it’s over! I couldn't really use the closet, as it has a ladder going up to a loft bed that I wanted to still have accessible, but I was still able to use the walls for hanging strips. (Yes, this tiny room has a whole twin bed in it, up by the ceiling! It's even storing an extra mattress at the moment!😂 See the corner of the first pic)You usually can’t have everything though, there will be choices to make, like keep books of similar types together, (saves time) or size (saves space). 8. “A place for everything…” The more often something is used, the more it needs it’s own specific spot to live, so you can always find it. Sometimes it is worth using a little more space to have dividers for commonly used items in a drawer, for example. Also label whenever possible. A little time and money invested in thought and containers can save you a lot of time and space in the long run! Of course these principles apply to other areas of your house too, like the kitchen. It’s been close to 30 years since I read that book, but I think of the principles often! It’s been great to have a little extra time to work on applying more of them, and my sewing area, even though it’s a fraction of the size, is actually even more functional so far because I was forced to be very careful about everything I put in it! And it’s definitely a work in progress, I haven’t even used the back of the door yet, hmmm... What are some of your favorite space or time saving tips? Thanks for joining me and Happy Sewing! Beret PS: In case you think I have a really organized house, I definitely don't! But I've gradually been working on that too. Below is a pic of what used to be a messy shelf, and is now a tea/cocoa area. The mugs fit in some otherwise wasted space, and are more accessible and visible than if they were on a shelf.
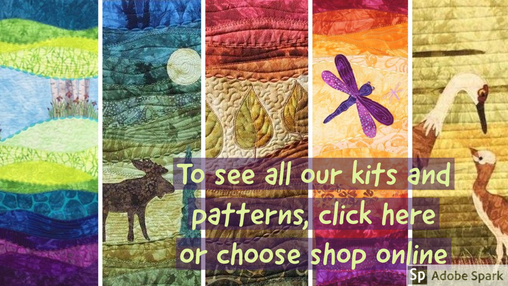
 Click the photo to see all of our kits and patterns!
|
Beret Nelson's On The Trail Creations Blog Page
Beret NelsonI am a homeschooling mom of three fun kids, who are now old enough that I have a little time to pursue my passion for sewing! After several years of making quilted cards and art quilts, I'm now designing kits and patterns. Some of my designs have been in Keepsake Quilting and Art Quilting Studios magazine! I teach classes online, and am starting to do more traveling and teaching. I also have many tutorials, including some on YouTube. I am blessed to live in Alaska where I am surrounded by the inspiration provided by the beauty of God's creation! Free mini art quilt workshop for new subscribers!
"Like" my facebook page!I am also an independent distributor for Plexus supplements, since I credit them with enabling me to be healthy enough to do all these fun things! They target blood sugar and gut health, which are at the root of so many modern health issues. E-mail me for more info, or check out my website! I am as passionate about getting people healthy as I am about getting people creating :-)
beret@onthetrailcreations.com or https://plexusworldwide.com/beretnelson  Archives
March 2024
|


 RSS Feed